The Making of My DIY Beauty Dish
Making my own DIY Beauty Dish is one of the coolest things I’ve ever had the satisfaction of accomplishing!
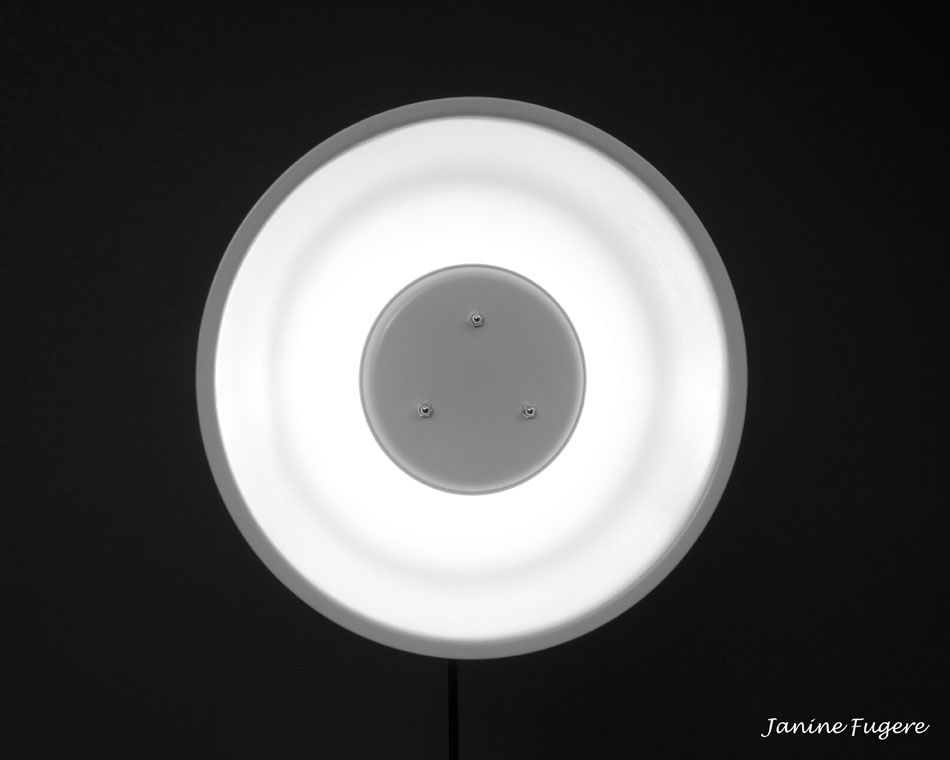
DIY Beauty Dish Illuminated with Canon 430EX II Speedlight
This super cool homemade “Do It Yourself” gadget is my newest piece of photography equipment and it is taking me into new territory in lighting techniques. I love it!!!
So what, you may ask, possessed me to make my own Beauty Dish???
Right up front, I’d like to acknowledge two photographers who inspired me to undertake this project. I’m grateful to Todd Owyoung of ISHOOTSHOWS.com, who created the design for the dish, and to Mike Luter of Studio Styles Photography Training for inspiring me to want a dish in the first place. These two photographers generously share their knowledge with others, which helped me on my way. Here is the story behind what led me to them & to building my own DIY Beauty Dish…
I’d been seeing many interesting effects other photographers get with a variety of lighting and wanting to improve my lighting skills. One photographer I follow is Mike Luter, who has a great page on Facebook called “Studio Styles Photography Training.” I love the work I’ve seen on his page. One day he posted the portrait below and I was blown away by the quality of the simple but impactful lighting Mike achieved in this photograph.

Along with this sample portrait, Mike has posted a Blog link to video describing the Simple 2 Light Set-Up he used. This video explains how the lighting effect was achieved using a Beauty Dish with a Speedlight as the main light and a gelled photoflood background light. Here is the link to Mike’s video about this shoot:
Mike Luter.com Simple-2-Light-Set-Up
Mike also offers great online training courses, on a wide variety of topics, at this site:
Mike & his “Studio Styles Photography Training” post inspired me to start researching Beauty Dishes, hoping I could get one on a really low budget. I did find some “bargain basement” dishes, but the reviews I found on them were not good. Quality Beauty Dishes seem to range anywhere from $300-500.
The universe led me the right way though, because I came across another photographer, Todd Owyoung, a music photographer who has become pretty famous for his post “The Best DIY Beauty Dish.” He & his brother designed & built their “Chinatown Special” Do-It-Yourself Beauty Dish, and people from all over the world have used that design to make their own Beauty Dishes. Below are a link & a screen capture of Todd’s post:
Ishootshows.com The Best DIY Beauty Dish

Todd & his brother also created a very helpful video tutorial on building the DIY Beauty Dish:
Ishootshows.com DIY Beauty Dish Video Tutorial

After reading Todd’s “how to” post & watching the video, I decided this was something I really could do. I’ve always been handy and I enjoy working with tools. So I set a goal to make my very own DIY Beauty Dish!
Todd’s dish is called the Chinatown Special, because he made it using a 16 quart stainless steel mixing bowl & an 8″ pizza pan which he found at a Chinese Restaurant Supply store. However, thanks to links Todd has on his site, I was able to order my mixing bowl & pizza pan from Amazon.com and didn’t have to go hunt down a Chinese Restaurant supplier! Todd’s site also has links to several choices of brackets to mount a Speedlight to the dish. I chose the Cowboy Softbox Bracket, which I also ordered from Amazon.com. So while Todd’s is a Chinatown Special, my DIY Beauty Dish would probably be better referred to as an Amazon Special. 😉
I won’t list all the parts, hardware, supplies, & tools needed for this project, because Todd’s post comprehensively covers this information. You need only click links on his site to find the parts you have to order, and you can copy, paste & print out the list of tools, and the required hardware & supplies, which you’ll find at your local hardware or home improvement store.
Once all of my parts arrived and my supplies were purchased locally, it was time to build my own DIY Beauty Dish!!!
The first step was to mount my Canon 430EX II Speedlight to the Cowboy Bracket, to determine the correct settings.

I adjusted the bracket so the flash head would extend just a tiny bit through a hole cut in the back of the dish, so light won’t escape out the back. I planned this by placing the bracket mounted flash face down on a table, making sure it was centered, then adjusted the settings until the flash head just barely lifted the bracket off the table.
Now I was ready to make a template for cutting the flash head hole & drilling the bracket holes in the bottom of the stainless steel bowl. I started by disassembling the bracket and tracing the outside of the bracket ring.

Disassembly allowed me to trace the full circle of the bracket, without the flash mount in the way. But I wanted to be sure my flash head ended up centered in the bracket, so I reassembled to the bracket & Speedlight to finish creating the template.

I also marked the four slots where holes to attach the bracket to back of the dish would be drilled, as well as three holes that would mount the pizza pan reflector to the inside. Here is my template, ready to cut out the hole for the flash head.

Here is the template with the flash opening cut, along with various other parts & tools for the project.

Various Parts: Template, Reflector, Bracket, Dremel
Next, I used the actual bracket ring to trace the outside circle onto the stainless steel bowl, simply because it was easier to trace the solid bracket than the paper template.

However, the depth of the bracket is too deep for a Sharpie to reach through the mounting slots & holes, so I used the paper template to mark those on the bowl, as well as to mark the flash head opening.

Since I’d traced the mounting holes through the paper template, I double checked their positions with the actual bracket & then finalized the holes for drilling.

Now came the moment of truth – time to cut the hole for the flash head!
Ironically, the most daunting part for me when contemplating making the dish was that I’d need to use a metal cutting wheel on a Dremel rotary tool, to cut a hole for the flash head in the stainless steel bowl. Little did I know that this would be far easier than I imagined. I practiced one time on an old mixing bowl that I didn’t care about. On this practice, I learned a few things about the metal cutting portion of this project:
- Follow Todd’s advice & wear earplugs!
- Safety goggles are also mandatory as tons of sparks fly while you are cutting.
- Avoided wearing any synthetic clothing such as polyester or nylon (which hiking photographers like me in Colorado practically live in). Those sparks while cutting the metal will melt synthetics in a flash of a second!
- When cutting, keep a steady hand.
- Don’t use pressure; let the high speed of the cutting wheel do the work.
- When cutting into the corners (the trickiest part), be careful not to let the cutting wheel “kick back” to the right, which caused over cutting a gash outside the boundary of the first corner I tried on the practice piece.
I got the techniques down & the rest of my cutting practice went fine. I was ready for the real deal!

After my “throwaway practice”, I easily managed a nearly flawless cutting of the flash head hole on the actual bowl for my Beauty Dish. Then I followed Todd’s advice to clean up the edge with an aluminum oxide grinding stone on the Dremel.
The next step was preparing the pizza pan reflector for drilling. I used the template again to mark the 3 holes that would be used to mount the reflector to the inside of the dish.

Here is the pizza pan reflector marked for drilling:

Now it was time to drill the holes for mounting hardware in both the stainless steel bowl and the pizza pan reflector, and to use the aluminum oxide grinding stone on the Dremel to clean up rough spots and burs around the holes. Then the last step before painting was to sand both pieces, in order to provide a good surface for spray paint to adhere to. Here are both pieces ready to paint:

- Now is when the real challenges began!
- Any can of spray paint states temperatures must be above 50 degrees for use.
- My luck was that a 15-18 degree cold spell set in just on the day I was ready to start painting!
- I improvised a heated “paint shop” so I could paint in this cold weather by hanging lots of tarps and blankets to completely enclose a small portion of my garage, in order to contain heat from a space heater.
- So much for the instructions to only use spray paint in a well ventilated area!
- To make up for painting in a poorly ventilated area, I wore a painter’s mask with a charcoal filter.
- The “paint shop” with space heater did the trick & it was just warm enough to get a good paint surface.

Here is a photo of the bowl & the pizza pan, with the white paint completed:

About now is when I realized just how much the Dremel cutting had truly been the least of my challenges. I do not have any more photos of the paint process because things got a bit hairy. I mean literally!
- My advice is, if you have a dog, give it away & have your entire home & garage professionally cleaned before undertaking the painting portion of this project!
- If you love your dog too much to give it away, like me, then plan on buying extra paint and going through several rounds of having to sand off some dog hair that got stuck in the paint, and then repaint again (and again…)
I also came across another painting challenge, which I will offer these tips on how to avoid:
- Once finished with the white inside of the bowl, be very patient to let it dry completely before turning it over to paint the black side.
- Also, place some wax paper under the white rim of the bowl when you do turn it over, so the paint won’t stick.
- I learned this the hard way – when I’d finished my black paint on the outside, my white rim had stuck to the cardboard & some peeled off when I picked up the dish. Had to sand & touch up the white again. Then had to touch up the black in all the places I accidentally got white on the outside. And so on…
Finally, I was ready for the Polycrylic Protective Finish. After seeing just how easily the paint peels & gets dinged just while I was working on it, there is no way I was skipping this step. I didn’t fool around – 6 protective clear coats on the outside, and 4 clear coats inside. Then I let the paint dry for 24 hours before assembly.
FINALLY – TIME TO ASSEMBLE MY DISH!
I was too excited to see the dish assembled to bother taking any photos while putting the parts together. See Todd’s “Best DIY Beauty Dish” post for illustrations of the procedures to attach the hardware. It was simple though:
- Use the (3) 1/4″-20 x 3″ round head slotted machine screws, with the washers and the jam nuts to attach the reflector to the inside of the bowl.
- Place the washer between head of the screw & the back of the bowl, and insert the screws through the back of the bowl.
- Next place a nut on each screw all the way up against the inside the bowl.
- Then place another nut close to the end of each screw.
- Don’t put the pizza pan reflector on yet. You need access to the inside of the dish to mount the bracket.
- Now mount the re-assembled flash bracket (but without the Speedlight) to the outside rear of the bowl using the (4) #4-40 x 1/2″ round head slotted machine screws & corresponding jam nuts.
- These are tiny suckers so you need to be patient & use a small flat head screwdriver, along with a needle nose or other very small pliers to hold the nuts on the inside while you tighten them.
- Last, slip the pizza pan reflector (concave side facing in) onto the 3″ machine screws inside of the dish.
- Finally, add another nut to hold the pizza pan in place. I used hex cap nuts for the outside, to give the piece a more finished look.
VOILA! READY TO MOUNT THE FLASH TO THE BEAUTY DISH!
Here are photos, from several angles, of my assembled DIY Beauty Dish:


As the saying goes, the proof is in the pudding, so it was time to put my DIY Beauty Dish to the test!
After fooling around with some self-portrait test shots, I was impressed enough with the lighting to feel confident about using the Beauty Dish with a real client. The next day, I took Senior Portraits for a student I’ve known for 5 years. Isaiah was a great subject & his portraits came out fantastic!
Incidentally, I also made the background in these portraits (many years ago), by dying a huge sheet of linen with Grey Rit Dye, and then hand painting the splotchy cloud effects on it. Very painstaking process, but I love the result.
Here are several poses from Isaiah’s Senior Portrait shoot (the first pose is his favorite):


I LOVE MY DIY BEAUTY DISH!!!
My mom once gave me a poster, when I was a teenager, which said, “If you don’t try, you’ll never know if you can do it.” I’m so grateful I was raised to understand this. Sure, it would have been far easier to just buy a Beauty Dish. However, it never would have given me the same satisfaction & pride of accomplishment that my DIY Beauty Dish has given me!
GO FOR IT – MAKE YOUR OWN DIY BEAUTY DISH!
Janine Fugere ~ As Seen by Janine: Eyes of the World Images


Pingback: Tweets that mention The Making of My DIY Beauty Dish « asseenbyjanine -- Topsy.com
Pingback: » Gearing Up for Serious Flash Photography As Seen by Janine's Blog
Pingback: » The Flash Bus Tour in Denver Was Totally Worth the Price of Admission! As Seen by Janine's Blog
Pingback: » Art Illumination: Flash Bus Style! As Seen by Janine's Blog
Pingback: » The Making of My DIY Beauty Dish (reposted) As Seen by Janine's Blog
Pingback: photography tutorial on using beauty dish « Learn photography