Upgrade a PC Operating System To Be Compatible With Adobe Lightroom 5
 Feeling left out of all the excitement about Adobe’s new Lightroom 5 because you have an older PC and your operating system will not run it? No worries! As Seen by Janine has created a step-by-step tutorial on how to upgrade an older PC operating system from either Windows XP or Vista to Windows 7 so you can get in on the newest Lightroom 5 creative tools!
Click Any Contents Heading To Jump There:
Why Upgrade to Lightroom 5 From an Earlier Version?
It was tempting to tell myself that I didn’t really need the Lightroom upgrade since I was already very happy with Lightroom 4. However, as the reviews and video tutorials hit the Internet, it became clear that there are plenty of new features I really wanted. I will assure you that even if, like me, you need to get an older PC updated so that it can run Lightroom 5, it’s worth the effort. If you’re already convinced too, great!
If you’re still on the fence about whether Lightroom 5 is exciting enough to make it worth the work, first read my previous post on all the Lightroom 5 Features Which Make It Worth Upgrading. The new tools I mention in that post were enough to convince me that Lightroom 5 is not only a must-have upgrade, but also are enticing enough to make it well worth the work to upgrade my computer so it can run this newest LR version.
Why Doesn’t Lightroom 5 Work With XP or Vista?
If you’re still angrily gnashing your teeth, mad at Adobe for not supporting older operating systems, this section is for you. If you don’t really care about any of that and just want to get on to upgrading your PC, skip this, go down to the next section, and you’ll be on your way!
The arguments about “Why did Adobe choose not to support older operating systems?” could easily fill an entire article. Instead, I will briefly summarize my own thinking, which got me over my frustration about this and moved me forward.
The way I see it, Adobe and other software manufacturers update their software, such as Lightroom, in direct response to features photographers have said they wish the programs had. Thus, the decision to update a product like Lightroom is a direct “supply in response to demand” business practice.
However, expecting Adobe, or any other software manufacturer, to release new software updates which support both the newest operating systems and still also support older operating systems is not realistic or practical; it would be neither cost-effective nor technically efficient.
Realizing these factors was enough to move me beyond frustration and into action. After extensive research and consideration, I decided it was worth the work to update my operating system in order to upgrade to Lightroom 5.
Why Not Just Get a New Computer Instead of Upgrading?
Oh sure, many say, “Why not just buy a new computer instead?” Their reasoning is, why put any time and money into upgrading an older PC which is likely already obsolete or will be soon? But let’s face it, being a professional photographer (or even a serious amateur) is expensive enough as it is and, for many of us, buying a new computer simply isn’t next on the list of priorities. This is especially true if your PC meets all the system hardware requirements for upgrading and is in great running condition. Thus, for me, upgrading my existing computer seemed my best answer. If you’re in the same boat, read on while I walk you step-by-step through the process.
Where to Start Once You’ve Decided to Upgrade?
Where to start depends upon what Windows operating system you are currently running. Typically any PC based photographer who is using products like Adobe Lightroom is at the very least using Windows XP or Windows Vista, so this article will not address upgrading from older systems. If your operating system is older than either of these, your computer probably doesn’t meet the system hardware requirements for a newer operating system or for Lightroom 5 either. In any event, the starting place is determining exactly what operating system you’re running, whether it is 32 bit or 64 bit, and what new operating systems are options for you.
If You Are Currently Running Windows XP
Unlike users of the newer Vista platform, the sad news for XP users is there is no way to do a simple operating system upgrade from XP to Windows 7 or 8. You’ll have more work to do because an upgrade from XP requires a custom installation which doesn’t preserve your files, settings, and programs. You will have reinstall everything after the newer Windows installation. Still do-able if you’re motivated, and if you actually have all the installation CDs for all your programs and devices. While I did not have to go through this since I was upgrading from Vista, here is a very helpful article for XP users by Acronis on performing a full system backup and then Migrating from XP to Windows 7.
If You are Currently Running Windows Vista
Vista users are at an advantage because a true upgrade to Windows 7 is possible, which keeps all your programs, files, and settings intact. You won’t need to migrate all your programs, files, and settings back onto your computer afterward. It is still sound practice to back up your entire system, including all programs and your old operating system itself, using a total backup system such as Acronis True Image. This way even if anything does go awry in what is normally a simple upgrade, you can restore your system to its former state.
Windows 7 or Windows 8 – Run the Upgrade Advisors
In deciding whether to upgrade to Windows 7 or 8, it is vital that you download and run the Upgrade Advisors for each operating system. These will tell you if your PC meets the system requirements to run the new operating system. Each Advisor will also tell you which of your drivers and devices, such as printers, external hard drives, USB and Bluetooth devices, will be compatible, and which of your programs will run on the new operating system.
Find out if your PC can run Windows 7:
Microsoft Windows 7 Upgrade Advisor
Find out if your PC can run Windows 8:
Microsoft Windows 8 Upgrade Advisor
If You’re Upgrading Anyhow, Why Not Windows 8?
Why go through all this work and not get the newest (and less likely to become obsolete tomorrow) operating system? Compatibility, in a word, or more accurately, incompatibility. I upgraded from Windows Vista to Windows 7, rather than Windows 8, because it was far more compatible with my existing hardware, devices, and programs. After running the Upgrade Advisors, I learned that too many of my devices and programs are not yet compatible with Windows 8.
By contrast, all my devices and programs are compatible with Windows 7, save for one program which I rarely use, and it has a Windows 7 compatible update available. So Windows 7 was the choice for me.
If you’re also running on an older PC, this is likely also the most compatible choice for you. Thus, the remainder of this article will focus solely on an upgrade to Windows 7.
Download and Run the Windows 7 Upgrade Advisor
The links above will help you download the Upgrade Advisors. Be sure to follow the tip to connect and turn on all your devices before running the Advisor so Upgrade Advisor can check them as well as your main system hardware.

Analyze Results of Windows Upgrade Advisor Report
I have an older PC running on Windows XP and a newer PC running on Vista. I had considered updating both computers so I could run Lightroom 5 on either. However, here is a portion of the Upgrade Advisor report for my XP system:

Note that the very beginning of the report says there were 9 compatibility issues. Most significant to me was the part which says, “Custom Installation Required! You’ll need to perform a custom installation of 64 bit Windows 7 and then reinstall all your programs.” More work than I wished to do, especially on an older and slower PC; not to mention the fact that many of my devices and programs are not yet compatible with Windows 8. So from that point, I focused solely on upgrading my newer Vista based PC.
The Advisor report on my PC with Vista showed I was able to do a simple upgrade from Vista to Windows 7 without having to reinstall all my programs, files and settings. Plus, all my devices and programs were compatible. Thus my decision was made: Window 7 was the best choice for me. Sorry no screen shot of my Vista to Windows 7 Advisor report, but I was so excited once I saw I was good to go, that I forgot to take a screen shot!
Deciding on the 32 bit or 64 bit version of Windows 7
Seasoned photographers know that 64 bit systems are hands-down better for photography. 64 bit systems are better able to handle large amounts of RAM (4 GB or more) and also are more responsive when running multiple programs simultaneously (i.e. Lightroom, Photoshop CS6, music playing while you work…). So the answer is, 64 bit is the better choice when you are changing operating systems. The question is, can you “upgrade” to 64 bit or will you need to purchase a full installation version?
If you’re currently running on Windows Vista 64 bit, you can easily upgrade to Windows 7 64 bit. If you’re running on Vista 32 bit, then unfortunately, you cannot upgrade to Windows 7 64 bit, even with a custom installation. Instead, you’ll need pay a bit more to buy the full version of Windows 7, not just the upgrade version, and do a clean install. This means reinstalling all your programs, files, and settings afterward.
If you’re running on Windows XP, then no matter whether you have XP 32 bit or XP 64 bit, either way you still have to reinstall everything after your Windows 7 install. So that reinstallation work shouldn’t drive your decision. What you do need to determine is if you can upgrade to 64 bit Windows 7. If you have XP 64 bit, you can use the upgrade version of XP to Windows 7, but if you have XP 32 bit, then you’ll either need to settle for running Lightroom on a 32 bit system, or you’ll need to pay more to get the full installation of Windows 7, not just the upgrade version. If it were me, I’d opt for buying a full Windows 7 installation, not just the upgrade version, in order to get 64 bit capabilities.
Getting Ready for the Upgrade
The Advisor Report gives links for any program or device which has an update available to make it compatible with Windows 7. Thus, my first step was to use those links and update every program and device driver the Advisor recommended.
Next, I did some serious housecleaning of my PC. I went through and removed all programs I never use, deleted old files and documents no longer needed, cleaned up my desktop, and organized everything as efficiently as possible. I ran a full system virus and spyware scan as well. Once I’d finished all that cleanup, I emptied the Trash and then ran a disk defragmentation to minimize gaps on my hard drive where I had removed things.
Because I use the quickstart links feature of my taskbar to access my most frequently used programs and websites, I also created a simple MS Word document with all my favorite programs and website hyperlinks listed in the order that I like them. I am a creature of habit and wanted it to be easy-peasy to recreate my quickstart links on my task bar. This document also contained all my usernames and passwords where relevant, since I wasn’t positive if they’d be preserved in my system upgrade.
Backup Everything Before the Upgrade
Backups were the last step of preparation for my upgrade. I keep my photos and my Lightroom Catalog on an external hard drive, so first, I backed up both of those onto a second external hard drive; redundancy is worth the effort when it comes to my treasured images! Then I ran a full system backup. I use Acronis True Image, which can create a complete backup of your entire system, including the operating system itself, along with all your programs, files and settings. Although it was not likely I’d need to use it, this was my safety net. Just in case anything went wrong with my Windows 7 Upgrade, I’d be able to restore my system to its previous state. Thankfully I did not need it, but better safe than sorry!
Run the Windows 7 Upgrade Installer
If you have followed all the steps detailed thus far, your upgrade to Windows 7 should go relatively smoothly, especially if you are upgrading from Vista. Hopefully, you already have the 64 bit version of Vista, so you can upgrade to Windows 7 64 bit. If not, I’d seriously consider doing a “clean install” to take advantage of running Lightroom 5 on a 64 bit system.
In any event, even for a simple upgrade like I did, I strongly recommend setting aside the better part of a day to do the installation. There will be many times during the upgrade that your computer will need to restart, many times you’ll be asked to enter your Administrator password, or at the very least, say, “Yes, I grant administrative authorization…” So get comfy, bring in some snacks, and use the time to read up some of the many tutorials or eBooks available to help you learn about Lightroom 5’s new features. Just keep your eye on the screen regularly to see if you’re being asked to authorize any steps in the upgrade process.
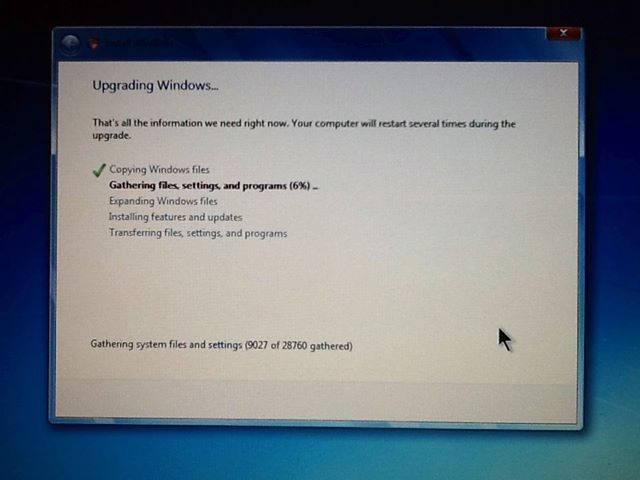
If things are going well, you are going to see a screen which looks something like this (sorry it’s a cheesy iPad photo, but obviously I couldn’t create screen shots in the midst of an operating system upgrade):
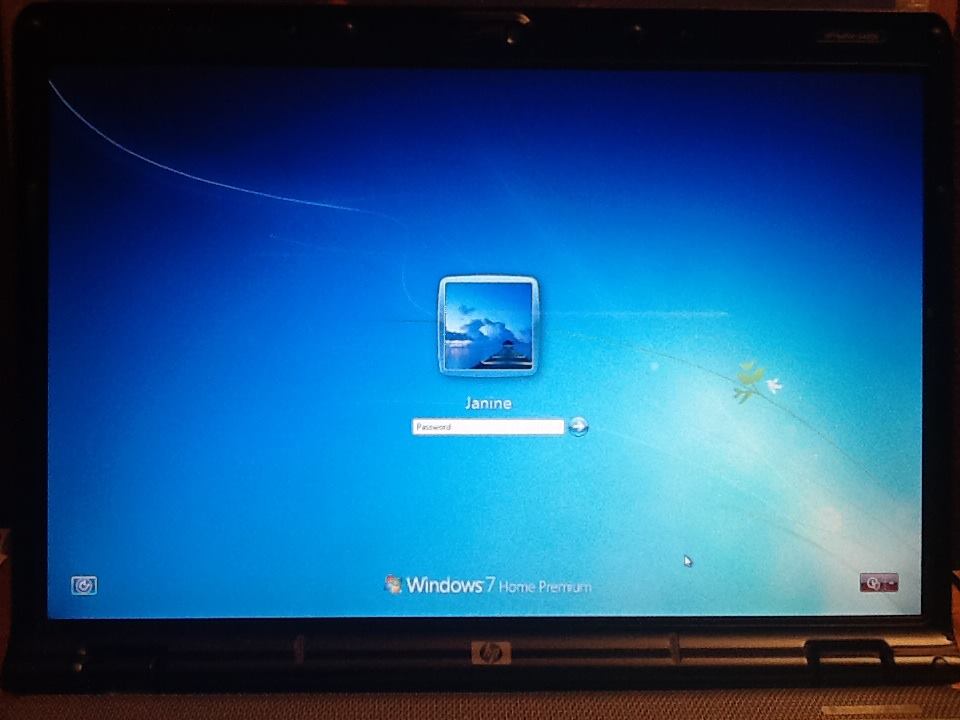
You will know you are almost home free when you see a screen like this to allow you to log in to your new Windows 7 system:
Debug Any Glitches Detected During the Upgrade
You may have noticed I mentioned “You’ll know you are almost home free…” in the previous section. I used the word almost because, like I did, you are bound to discover some bugs and glitches. I will share a few snafus I encountered which, from my research on the web, it seems plenty of others ran into as well.
The first glitch was one I considered very significant: an error message stating “qttask.exe is conflicting with the color scheme so the color scheme has been reset to a Basic 7 Color scheme.” Anything that would make me have to settle for a lesser color scheme was NOT okay in my book!
To resolve this, I used “CTRL-ALT-DEL” to bring up my Task Manager, then clicked on the “Processes” Tab. I found the qttask.exe process in that list and saw that it was associated with some Apple program. That seemed ironic since I had no Apple related programs on my system that I knew of. Likely it was a leftover from an old version of iTunes or Quick Time which I had since removed. To stop this executable process from running, I did the following:
Control Panel > Administrative Tools > System Configuration > Startup
This opens a list of all programs and process which run automatically every time Windows starts. I found the qttask.exe process in this list and unchecked it.
Another glitch I ran into was related to the Internet Explorer 10 browser. Part of the upgrade to Windows 7 automatically installs IE 10, but every single time I opened the browser, I got an error message saying there was a problem with “Smart Web Printing” which is a Hewlett Packard feature. Again, a Google search helped me discover that countless others have had this problem.
Many might say just don’t use Internet Exporer, go with Chrome or Firefox. I wish it were that simple, but I’ve found there is no one browser which works well for all the various things I do on the web. So I use different browsers, including Internet Explorer, depending on what I’m doing. The solution to the IE10 Smart Web Printing glitch is to go into your Internet Explorer Settings > Manage Add-ons and scroll down the list until you find HP Smart Web Printing and disable it.
While you’re there, it’s a good time to disable any other add-ons you don’t want cluttering up your browser. It is shocking how many you will find, because every single time you install something on your computer, typically there are add-ons hidden in the fine print of the installation procedure. Disable anything you don’t use and don’t want. If you’re not sure what a given add-on is, either leave it alone or Google it to learn more about whether you want and need it.
Optimize Your Start System Configuration
While I was removing the qttask.exe process (the first glitch I encountered) from my Start System Configuration, I very carefully reviewed the entire list. I unchecked every single process which I don’t need to run automatically every time I turn on my computer. To clarify, unchecking a process or program so it doesn’t run automatically at startup does not mean you are removing that program or process. It only means the process will only run when you tell the computer you want it to. Again, the steps to do this are:
Control Panel > Administrative Tools > System Configuration > Startup
Unchecking all processes you don’t need to run every time you use your computer speeds up your system startup time. Even more significant for photographers, this also frees up RAM by not running processes you aren’t using. This is very important for photographers who naturally want as much RAM as possible available for memory-hungry programs like Lightroom and Photoshop.
A word of caution here: if you are not certain what something is, it’s best to leave it and not uncheck it. Typically, if you want to know if any process is vital, Google it and you’ll find an article or two advising you on whether or not it is critical.
You’ll be amazed how many things are running every time you start your computer which don’t need. I ended up removing over half of the processes which were automatically running on startup. Taking the time to uncheck them is well worth it to make your PC as efficient as possible, both in general and especially for photography applications.
Run Windows Updates – Especially Service Pack 1
I wish I could say you are home free at this point, but running Windows Updates was the most time consuming and frustrating part of the entire upgrade process for me. The best advice I can give is do not use the option to install all updates at once. Your system will spend a long time seeming to install them, only to give you a message that many of the updates failed.
Absolutely vital is to install Service Pack 1, because it is a system requirement for running Lightroom 5, so start with this single update. From there, pick and choose what you truly think you need. Of course, Windows will give you the impression that every single update is extremely vital. More likely is that you only truly need to update a few other things, at least in the short term.
Update Any Drivers You May Still Need
When looking through available Windows updates, there may be more recent versions of some of your drivers. I found this to be true, even though I’d updated drivers during the Upgrade Advisor process. I recommend only running one update one at a time. Some drivers you may be able to update straight through the Windows Updater; others, such as my HP Photosmart printer driver, I found I had to go to the manufacturer’s website to obtain.
Hopefully, this process will be pretty quick for you. Whenever in doubt, Google search to find what you are looking for. At the very least, ensure you have Windows 7 Service Pack 1 and your device driver updates. Then, if your computer is up and running well, with no apparent problems, you can install other updates later, at your leisure.
Color Calibrate Your Display After Your Upgrade
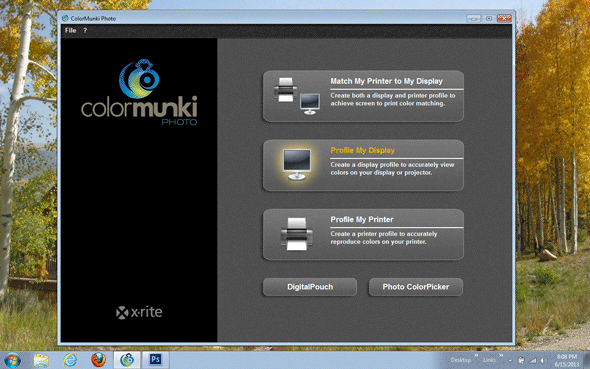
Actually, one of the steps in the process of running the Windows 7 upgrade is a color calibration step. However, it is pointed out that if you have your own color calibration software, it is more optimal to use that for the best color. I use an X-Rite ColorMunki to calibrate my display and my printer. Here is a screen shot of my ColorMunki software about to profile my display:
Finally – Install Adobe Lightroom 5
The reward for all your efforts has finally arrived and your system is now ready for you to upgrade to Adobe’s new Lightroom 5! Some photographers may be installing Lightroom for the first time, either if you’ve never owned it, or if your version is too old to qualify for an upgrade.
If you’ve never upgraded from an older version of Lightroom before, I highly recommend you view this tutorial, How to Upgrade to Adobe Photoshop Lightroom 5, by David Marx of LightroomLab.com, before you begin.
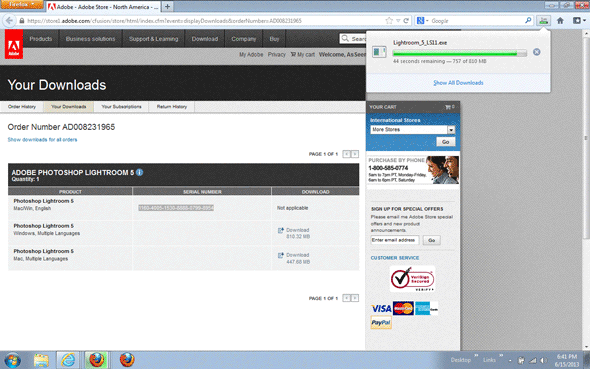
Here is a screen shot of my Lightroom 5 upgrade in progress and let me tell you, I was one happy camper when I saw that green installation progress bar almost all the way to the right, showing only 44 seconds remaining!
My happy camper mood elevated to truly ecstatic once this is what I saw, because I knew I was home free!
Don’t you just love the new “Lightroom 5 Splash” welcome screen?!?!? Actually, there is an option to turn this feature off, if it bothers you. As for me, I will keep it forever, because it so much reminds me of how incredibly happy I was when all my hard work of updating my operating system paid off, and then I finally saw Lightroom 5 open on my computer for the first time!
Backup Everything Again After Your Upgrades
Given how much hard work you’ve put into upgrading both your operating system and Adobe Lightroom, take the time to run another full system backup. I recommend that you do not delete your old full system backup of your XP or Vista System. You never know if you may discover some reason down the road that you might need to revert your system to an earlier state. Instead, ensure you have enough space on an external hard drive and create an entirely new full system backup using a reputable backup product such as Acronis True Image, or many other similar backup solutions.
If you have an older PC, don’t let that stop you from getting in on the fun and exciting new features in Lightroom 5. Hopefully, this step-by-step tutorial has convinced you to take the plunge and upgrade your operating system. This was written based on my operating system upgrade, and will save you a lot of time, research, and aggravation.
If you find this tutorial helpful, or if you know of others you think it will help, please share the link on your own blogs, websites, and social media sites. My goal is to help as many people as possible to be able to enjoy using Adobe’s Lightroom 5, even if they have older computers!
By Janine Fugere
As Seen by Janine: Eyes of the World Images


Leave a Reply