Upper Forest Lake at Colorado’s Continental Divide: Behind the Scenes Specs
There is nothing like a hike up to a high country Colorado alpine lake to remind me that I live in one of the most splendid places on earth! I love this photograph of Upper Forest Lake at the Continental Divide.

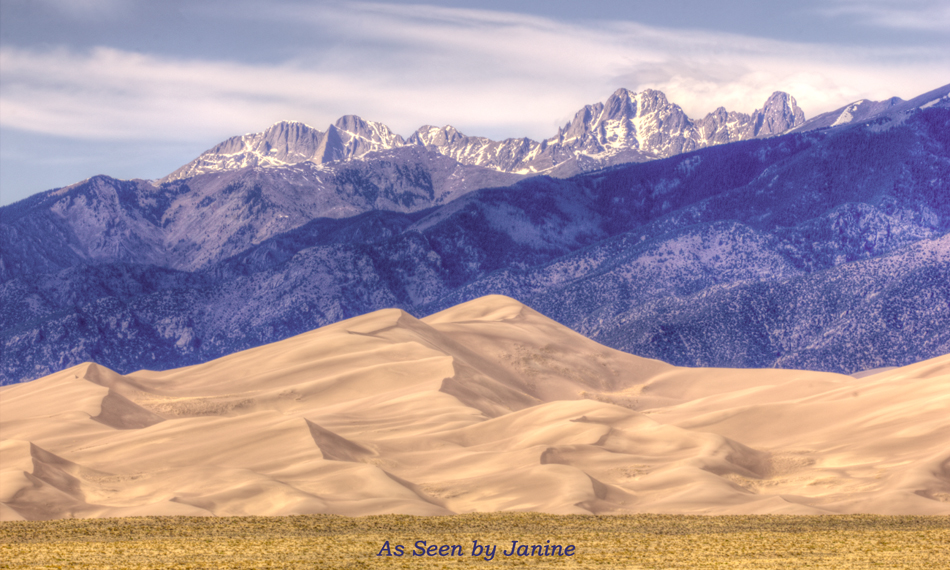
Upper Forest Lake and Continental Divide in Late Spring
This spot is located in James Peak Wilderness, one of my favorite areas to hike, backpack, camp, ski, fish, and of course, take stunning photographs like this one!
Upper Forest Lake is a fairly recent discovery of mine, despite that I’ve been playing in and photographing James Peak Wilderness for over eleven years now. There is also a lower Forest Lake, about 1/2 mile below this one, but Upper Forest Lake is worth the extra moderately steep hike up that last 1/2 mile, due to the magnificence of the east face of the Continental Divide as its backdrop. I first hiked to this lake last October on a late fall backpacking trip with my dog and photo mascot, Kiah. It was gorgeous last autumn, too, when I created the HDR (High Dynamic Range) photograph below with a very surreal “painterly” effect:

Upper Forest Lake Reflections in Autumn
While I love the surreal look of that photograph, on this late spring visit, my goal was to create an HDR with a more realistic appearance, while still successfully achieving the full tonal range of colors and contrasts from the brightest to darkest parts of the scene. I also wanted to include the full scope of the scene with the ridge of the Continental Divide visible.
Because, on both trips, I was backpacking and had a very full pack loaded with gear for a full weekend of camping, I had not carried a tripod on either trip. That is normally a deal breaker for creating successful HDR photos since they are made with multiple exposures of the same scene and any movement at all can be problematic, causing ghosting. While the autumn shot above did not have ghosting, the originals were not as tack sharp as I’d have liked. That is one of the reasons I went with a painterly effect, aside from the fact that I really do love surreal HDR photos. The added reason was that the painterly preset in Photomatix naturally mutes sharpness as part of the effect, so it worked well with the three bracketed exposures I had taken.
This time around, however, I wanted a tack-sharp and true-to-life image! For many of my shots on this early June trip, I solved the “no tripod” problem by bracing against a tree or rock to prevent camera movement. In this particular spot that was not possible though; there was nothing to brace on and still get the point of view I wanted of the scene. My solution was a basic Photo 101 technique: I stood with a wide and solid stance, locked my elbows into my ribcage and braced the camera against my forehead, creating a sort of “human tripod.” Last, but not least, I held my breath before very gently squeezing the shutter. I took several shots at varied exposures this way and luckily they all came out sharp.
However, there were some differences in perspective between the shots, so I did not combine my varied exposures to create the final HDR. Instead, in post processing, I picked the best “compromise” exposure using my histograms to choose the image with the best exposure curve: somewhat to the highlights (right) side, but with no blown out highlights crammed against the far right of the histogram. This was the exposure I chose:

Upper Forest Lake Original Exposure
It was tempting to choose one of the darker exposures, because this shot absolutely does not look the way I remember the scene. Many might say it’s a nice photo just as it is, but trust me, this is not the majesty that I saw. The highlights are too bright, the sky is not the vivid blue I’d seen, and the beautiful emerald green color of the water is missing entirely. Luckily I’ve learned that it’s important to choose a shot with the histogram as far to the highlights side as possible without blowouts hitting the right edge of the histogram. The reason is that it’s easy to recover details seemingly lost in bright highlights (so long as they aren’t blown out); however, there is no way to put details into the shadows of the image which were never captured in the first place, due to too dark an exposure. So while this image looked far less striking than what I remembered, I took solace in knowing I’d be solving the washed-out look by creating an HDR. Luckily, there is a simple way to create a quality HDR using only a single exposure. I do not mean opening a single image in Photomatix and then applying tone mapping to it. This is possible, but gives marginal results.
Instead, I used the Alternative HDR Technique described in May by guest blogger, James Woody. Using the technique I learned from James, I created an HDR by making virtual copies of my best single exposure and altering the exposures of the copies in Lightroom. A typical HDR is often bracketed at +2EV and -2EV along with the original exposure, but on this scene, I did not need this much latitude; in fact it would have resulted in severely blown out highlights. Thus, I set my two virtual copies at +1EV and -1EV using the exposure slider in Lightroom’s Develop module. I then exported all three of the images directly from Lightroom into Photomatix Pro HDR.
Because I wished for a true-to-life look, this time I didn’t use a “painterly” effect in Photomatix, as I had last fall. In fact, I didn’t even use any of the program’s “tone mapping image enhancement” options. Instead, I chose to go with the “exposure fusion” option in Photomatix, which gives a more realistic combined result. Granted, there is a compromise; fusion does not achieve quite as broad a continuum of the tonal range of colors and contrasts in some of the darkest and brightest areas as tone mapping. However, I was able to solve this by saving the HDR fusion image (as a TIFF file) and then further editing in Photoshop CS5 using onOne Software’s Photo Tools 2.5 plugin.
Photo Tools allows very selective work on specific parts of the photo, such as adding more dynamic range only to those parts of the image where detail and colors had been lost in the shadows or highlights. The adjustments I used in Photo Tools included: Brush More Dynamic Range, Brush Darker, and Brush More Color, but these were applied only to those very specific areas needed to capture the reality I remembered in the scene. The fact was that those details and colors were there in the image, especially since I’d chosen carefully the best compromise exposure. The Photo Tools brush effects simply allowed me to recover what was in the image file but not showing up on the screen, exactly like old fashioned dodging and burning in when printing from film in the darkroom. The Photo Tools effects are very highly adjustable using the size of the brush as well as the fade and opacity setting for each tool. This enables individually fine tuning the effects on carefully controlled areas, allowing me to to pull out the details I want, without making the entire photo look overly processed.
In the end, I achieved a final result I am extremely happy with because it looks exactly as I remember seeing it when I was at Upper Forest Lake.
Upper Forest Lake and Continental Divide in Late Spring
The only better view you can get is if you hike there yourself! Highly recommended, but I’m happy to share this photograph as an easy way for you to see the splendor that lies in Colorado’s high country in late spring!
As Seen by Janine: Eyes of the World Images


Leave a Reply