Alternative HDR Technique: Guest Blogger Tutorial by James Woody
As promised, I am happy to present the first ever Guest Blogger post on As Seen by Janine’s Photo Blog. James Woody, a photographer from Houston, explains in detail an alternative HDR technique which enables the creation of a multi-exposure HDR photograph from a single exposure.
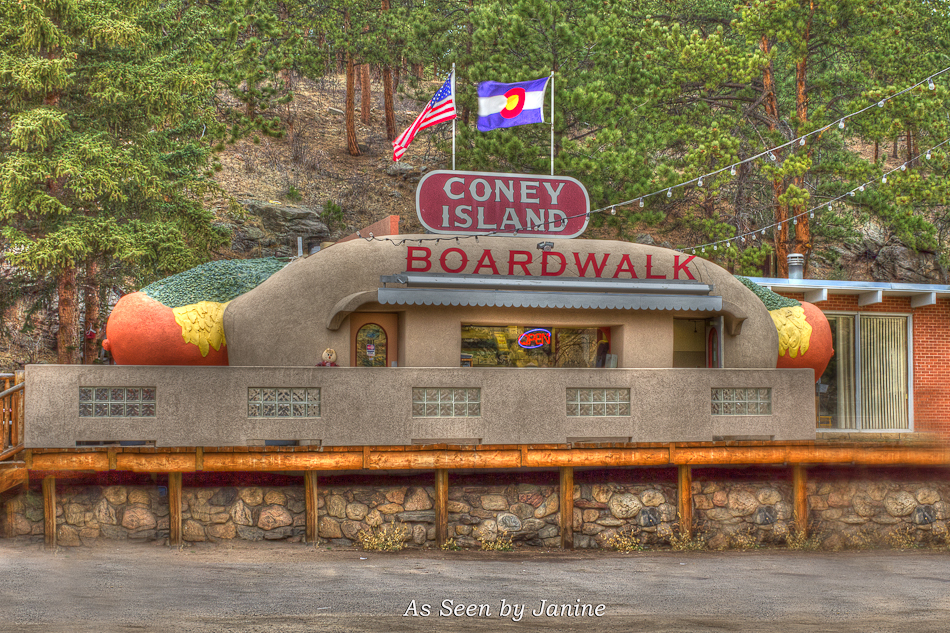
James taught me the alternative technique I used to create my HDR photo of the Coney Island Colorado hot dog stand featured in two recent posts. I was so happy with my result using James’ tip that I asked him to share his method in a guest post. Without further adieu, I present James Woody’s tutorial:
Alternative HDR Technique Using Lightroom:
Guest Blogger Tutorial by James Woody
In this tutorial, I will share with you an alternative method for creating the multiple exposures needed for HDR (High Dynamic Range) processing, using a very simple technique in Lightroom. I discovered this technique while experimenting with the Lightroom functions, and later from doing a little research over the web, I also found a few other people who had used it successfully.
During the past year, I’ve become hooked on the impressive results that I can produce using HDR. As most of you are probably aware, HDR is a software capability that merges multiple images (at different exposures) into a single image that presents a broader range of tones and details. My personal style has evolved into using HDR as an integral component of my overall work process. When I’m taking photos in the field, I’m always thinking HDR, recognizing that some subjects work better than others for HDR. My normal process has included capturing bracketed exposures in my camera (Canon Rebel T1i), to give me the option later for HDR. I do not use HDR for the extreme / surreal look that others may prefer. Instead, my objective with HDR is to keep the image looking realistic, and to bring the subject alive, showing the rich tones, colors, and details that are not obvious in the normal exposure (thereby creating an image that’s much closer to what I actually saw at the time I took the photo).
Before going further, take a look at one of my recent HDR images (below):

HDR Example 1 - Created Using Alternative HDR Technique
This is a photo of a historical building in Texas (the State Capitol, located in Austin), a famous landmark that has been photographed many times. However, using HDR and good composition, I’ve created my own unique and attractive version (at least in my opinion). Notice the richness of colors and tones. Notice how the building details are amplified. Notice how the tones and contrast in the clouds give the sky a dramatic look. Without HDR, this photo would have been dull and very boring, with interesting details left hidden in the highlights and shadows.
Now what excites me about this particular HDR image is that I only had to capture one exposure in my camera. Later in my Lightroom post processing, I used that image to generate two virtual copies (with one adjusted to underexpose by 1.5 stops and the other adjusted to overexpose by 1.5 stops). I then did an export to my HDR software (Nik Efex HDR Pro) using the original image and the two adjusted virtual copies. The result is evident in my above HDR example which speaks for itself. Below is the original single exposure that I used as the source for the two virtual copies I created for this HDR:

HDR Example 2 - Original Metered Exposure
At this point, I’ll explain further about the alternative HDR technique, so that you can try it if this sounds interesting to you. But first, I need to provide a brief explanation of the Lightroom functions you’ll need to use. Note: I’m using Lightroom 4 (the latest release) and the following functions are unchanged from the prior version.
[Editor’s note from Janine: I used Lightroom 3 to perform James’ HDR techique on the Coney Island Colorado photo and found the process the same for these functions.]
- Virtual Copies – In Lightroom, you can generate multiple versions (i.e., virtual copies) from a single image that’s stored on your hard drive. To create a virtual copy, just right click on the original image, and then select “Create Virtual Copy.” There are many advantages of using virtual copies and unlimited ways that they can be used. Virtual copies are an extension of the original image, and they do not add more files to your hard drive since the settings reside only in Lightroom’s catalog. Once created, virtual copies take on all the attributes of the original image, can be modified independently, and can be exported to other formats (same as the original). The key caution to note is that, if you delete the original image, all of its virtual copies are deleted also.
- Exposure Adjustment – In Lightroom’s Develop module (Basic/Tone Section), you’ll find the Exposure Adjustment function, a feature that allows you to adjust overall image brightness. To adjust exposure, you can either use the slider or you can just manually enter exact exposure values. Here’s a more precise explanation of the Exposure function (taken directly from the Lightroom’s Help documentation): “The exposure values are in increments equivalent to aperture values (f-stops) in your camera. An adjustment of +1.00 is similar to opening aperture 1 stop. Similarly, an adjustment of -1.00 is similar to closing the aperture 1 stop.”
Now that we all have the same understanding of the Lightroom functions to be used, I can proceed with explaining the simple steps involved in the alternative technique for HDR:
Step 1 – Capture one exposure of a subject that works well for HDR. This should be an exposure in the middle of the tonal range. Important: Make sure that you capture this image in RAW.
- Initially, I suggest that you test this technique in parallel with an HDR that you’ve already created with your normal process that uses bracketed exposures captured in your camera. For your test, just use the middle exposure from your bracketed set of images.
- With an exposure in the middle of the tonal range, usually there will be shadows, highlights, or textures where all the details cannot be seen.
Step 2 – Import the original “middle” exposure to Lightroom. You can import this image as a RAW file (or convert it to DNG, as I always do).
Step 3 – Using your original image, create two virtual copies. You can generate more virtual copies if you prefer, but initially, my suggestion is that you work with only two to keep your first test simple.
Step 4 – With one of the virtual copies, go to Lightroom’s Develop section and use the Exposure function to underexpose it (your choice of stops). With the other virtual copy, overexpose it (same number of stops). Note: If you’re doing a comparison test, just adjust the virtual copies by the same number of stops as in the in-camera bracketed exposures that were used for the HDR you previously created.
Step 5 – Now select the three files (the original image and the two virtual copies), do a right click, and then select the function to export these files to your HDR software. I use Nik Efex HDR Pro, but my assumption is that this technique will work with any of the popular HDR software products that have a Lightroom plug-in.
[Editor’s note from Janine: I used the technique with my Photomatix Pro plugin and it worked great.]
Step 6 – At this point, in your HDR software, continue with your normal processing and make any adjustments you prefer to finalize your HDR image.
So that’s it; a very simple process. When your HDR image is complete, make your own assessment as to how the results compare to what you’re used to seeing.
As suggested above, do your initial test of this technique in parallel with an HDR created from your normal process, as I’ve done in the following example:
Here’s an HDR created using the more traditional HDR method, using three bracketed exposures (-2 EV, 0 EV, +2 EV) captured in my camera:

HDR Example 3 - Traditional HDR (created using in-camera bracketed exposures)
Here’s the middle exposure of my three in-camera brackets (0 EV):

HDR Example 4 - The Middle Exposure
Using the above middle exposure, I created two virtual copies in Lighroom, adjusted one to -2 EV and the other to +2 EV. I then exported the three images to my HDR software (Nik HDR Efex Pro) and created the following HDR image, keeping all the settings the same as when I created the HDR with the bracketed exposures. Here’s the result, which for the most part, gives me the same result as I got with the in-camera bracketed exposures:

HDR Example 5 - Alternative HDR (created using adjusted exposure virtual copies of the middle exposure)
Note: For most of the cases I’ve tested, I’ve been very pleased with the results. However, while testing the above case, I noticed some areas of color distortion in the clouds, and didn’t like it. After quite a bit of trial and error with the Lightroom functions, I concluded that this issue could be resolved by making a simple adjustment to the original image prior to creating the virtual copies. I just moved the Highlight slider all the way to the left to recover any blown out highlights in that exposure. After making that adjustment, I created the virtual copies again, reran the HDR processing, and the color distortion problem was gone. This particular problem was an exception, but the lesson here is that, if you ever get some unusual results with this technique, you may find an acceptable solution by just working with the various tonal adjustments in Lightroom and / or your HDR software.
Here’s another example…
First, an HDR created from three bracketed exposures captured in my camera (-2 EV, 0 EV, +2 EV):

HDR Example 6 - Traditional HDR (created using in-camera bracketed exposures)
The middle exposure from the bracketed set used for the above:

HDR Example 7 - The Middle Exposure
Using the above middle exposure as the source, here’s the HDR I created using the virtual copies. For the most part, the result is the same, except the single shot gave me a slightly different pattern of the flowing water:

HDR Example 8 - Alternative HDR (created using adjusted exposure virtual copies of the middle exposure)
For now, I still consider this technique to be experimental and will continue to test it along with capturing bracketed exposures in my camera, just to keep all my options open. I’ve been working with this technique for only a short period of time, and I can’t guarantee that it will work OK in all cases for everyone. It wouldn’t surprise me if, at some point, I run into some flaws and limitations. But so far, this process serves my own purposes very well, and the potential advantages I see are significant. By using only a single image as the source, I don’t have to be concerned with misalignment of multiple exposures, ghosting, storing extra files in my camera and PC hard drive, setting up (or forgetting to set-up) my camera to do bracketed exposures, etc. Also, compared to using fixed bracketed exposures, this technique has an added benefit of allowing me to try different exposure adjustments after the shoot, to arrive at a more optimized HDR image.
To wrap this up, my intent with this tutorial is not to promote this technique, but instead, to share it with anyone who may be interested in hearing about it. If you decide to try it, my recommendation is that you continue to test it in parallel with your normal process until you are comfortable with the results and can determine if there are any differences compared to your normal HDR technique.
About The Author:

James R. Woody
James Woody is an amateur photographer living in Houston, Texas. For information on his background and to see more of his photography, please visit his website: www.james-woody.artistwebsites.com
THANKS TO JAMES WOODY FOR SHARING HIS HDR TECHNIQUE!


Pingback: Upper Forest Lake at Colorado’s Continental Divide: Behind the Scenes Specs | As Seen by Janine's Photo Blog