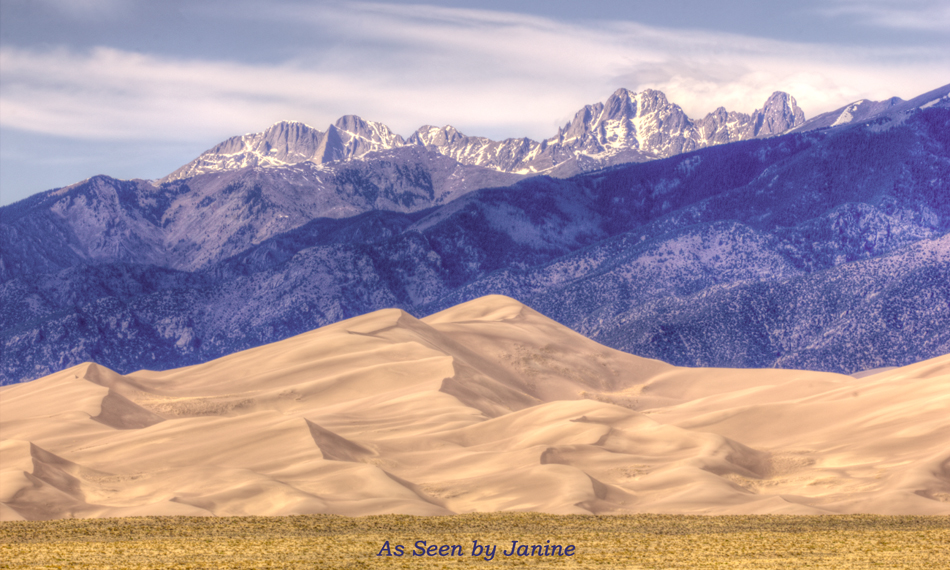
Realistic HDR Workflow: Great Sand Dunes National Monument in Colorado
This photo of Great Sand Dunes National Monument and the Sangre de Cristo Mountain Range, which I’ve been meaning to work on since Spring 2012, was created as a nine-exposure HDR (High Dynamic Range) image. I’m thrilled with how it turned out, especially because it was my first attempt using a new realistic HDR workflow I learned last summer. Read on to learn more about my workflow.
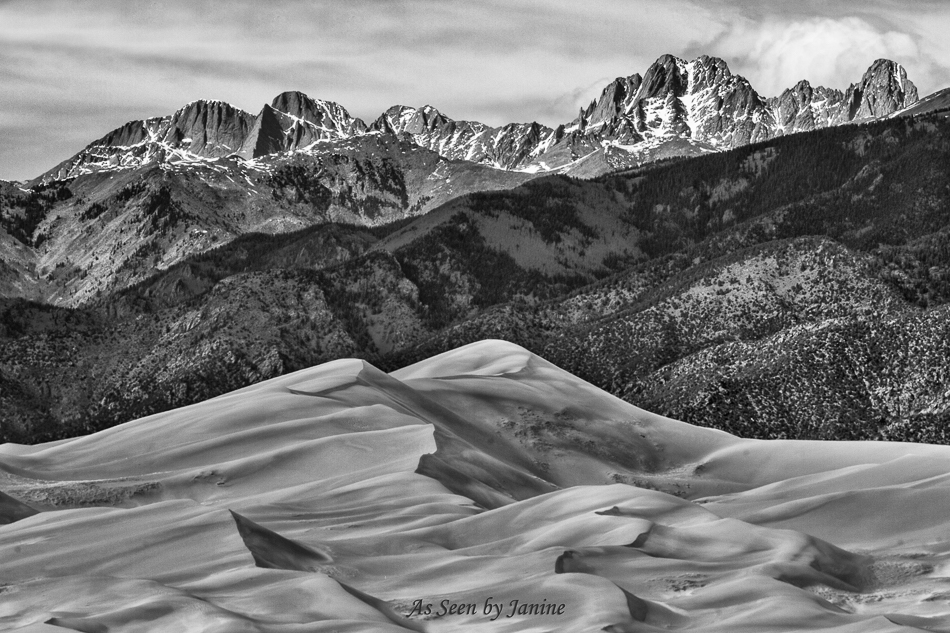
Great Sand Dunes HDR Merge to 32 B&W
Thanks to photographer, Chris Lord, for heeding my “Me, Me, Me!!!” call when he posted a 3-Day Landscape Challenge on Facebook, but mentioned he’d promised his challenger not to pass on the challenge. I really wanted to be part of the fun, to give me incentive to work on some landscapes I’ve never gotten around to posting, so I left Chris a “not even a little bit subtle” comment that I wished to be included. Chris was happy to respond with the equivalent of, “You asked for it, you got it; now you need to rise to the challenge!” I was happy for the incentive.
For my first day of the 3-Day challenge, I knew I wanted to go back and work on some stunning shots I’d taken at Colorado’s Great Sand Dunes National Monument in Spring 2012. It’s hard to believe it’s been 3 years and I still haven’t gotten to all those images. You all know the story: so many images with great potential… so little time…
I also knew another part of my goal was to experiment with creating some more natural looking HDR photographs. My past HDR photos have tended towards a surreal painterly style, which I really love; however, a professional goal for myself has been to learn to create more “realistic” looking HDRs, to broaden the market for my photography.
At the 2014 Breckenridge Photography Festival (a spinoff from the annual Colorado Photography Festival held down on the Front Range), I learned a new HDR workflow from photographer Glenn Randall. Glenn calls his workflow “Keeping it Real With HDR.” He recommends using HDR Soft’s Merge to 32 Bit plugin for Lightroom, to obtain a more natural and realistic-looking HDR than you can get directly within their standalone software or their full-featured Lightroom plugin, Photomatix Pro 5.
Off I went to HDR Soft’s website to find and download this Lightroom plugin:
(Note: To see sharper and larger renditions of any of these screen captures, or of the photos themselves, click the images to open directly; then use your back browser arrow to return to this post.)
Merge to 32 bit Plugin for Lightroom by HDR Soft
I did a Google search for coupon codes and found one on EssenceInPhotography.com for 15% off. “PerfectHDR” is the code I used and it still worked, even though that was a post from 2012. Although it’s a very affordable plug-in to start out with at only $39, I was happy for the 15% discount, since every little bit helps!
Despite that I had a hunch that in the end I would want to create a black and white of this photograph, as always, the beginning of my workflow entailed initially creating the best possible color shot I could of the image. What follows is the full workflow I used, to create the initial color HDR, followed by my workflow for making the black and white conversion.
Before any merging, alignment of the bracketed exposures was going to be critical. Even though I had used a tripod, it was extremely windy this day, so I knew there was likely some camera movement, despite my having used a tripod. For this reason, before merging the nine exposures, I used Uew Steinmueller’s Stack-Align-Crop script in Photoshop CS6, to ensure the layers were aligned as best possible. See more about Uwe’s script here: http://asseenbyjanineblog.com/hdr-photography/handheld-hdr-photos/
This screenshot shows my nine exposures loaded as layers in Photoshop CS6, with me about to run the Stack-Align-Crop script:
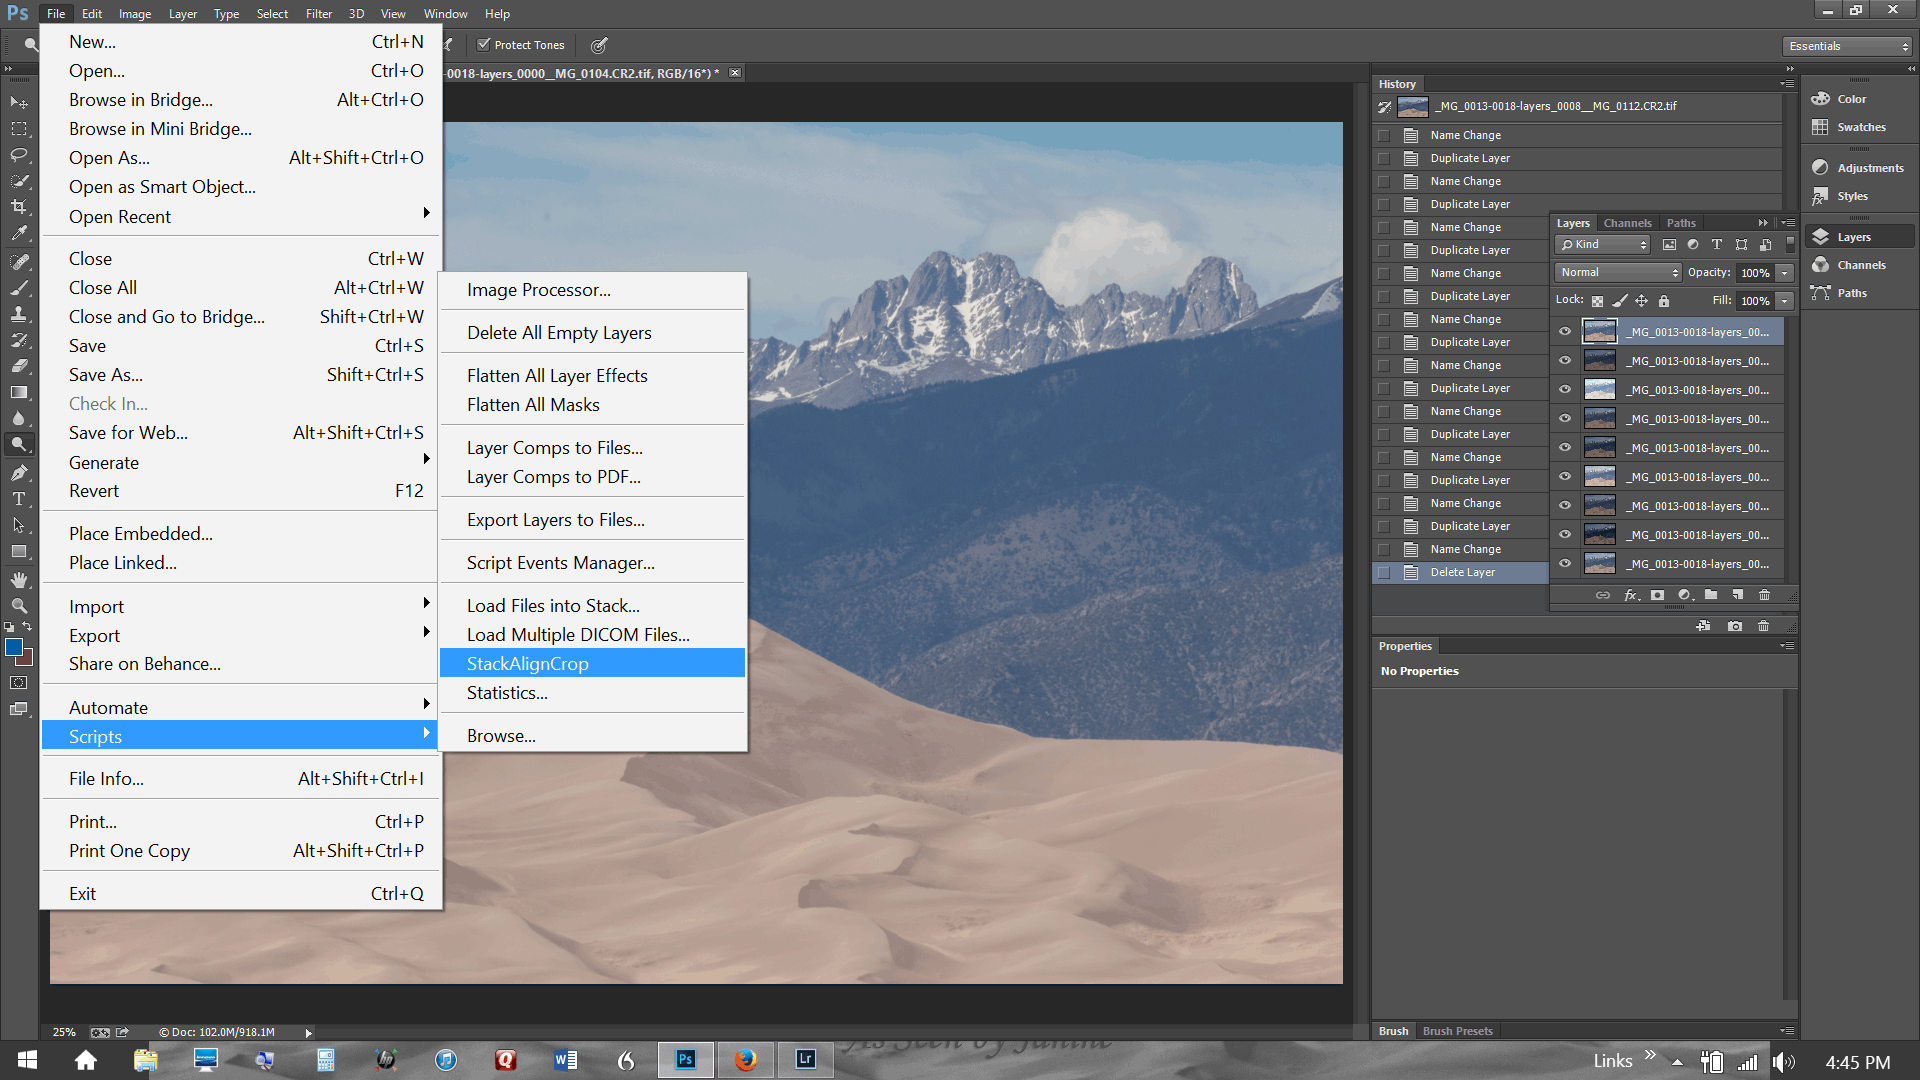
Stack Align Crop Script in Photoshop CS6
I find Ewe’s script is more effective than Photoshop’s Load Files into Stack script; it also works more accurately than the alignment options available in any HDR software that I have ever used. Any time I have taken bracketed exposures without a tripod, or times like this when I did use a tripod, but there was likely movement of the camera, the elements within the scene, or both, I use Uew’s Stack-Align-Crop script.
This script will create perfectly aligned and cropped layers in Photoshop; then you export the layers as TIFF files back into Lightroom. This screenshot shows, at the bottom of the history, that the layers have been aligned, & cropped, and now I’m running the built-in Photoshop script to Export the Layers to Files:

Export Layers to Files after using Stack Align Crop Script
It wasn’t easy at this point to remain patient enough to avoid jumping straight to trying the Merge to 32 Bit plugin. It truly was tempting, especially now that I knew I had properly aligned and cropped TIF layers. I resisted my impatience because I knew it was important to make sure each of the bracketed exposures was optimized before merging the files.
The starting point for my exposures is that these nine shots were bracketed by +/-1 EV increments. One might wonder why I simply didn’t use the metered exposure, a +2, and a -2, which is the most common simple way to create an HDR.
The reason I chose to use all nine exposures is I had previously learned from another photographer, Andy Cook, that using more exposures rather than fewer helps to reduce noise when creating HDRs. Andy had mentioned this to me during some discussion time at the earlier June Colorado Photography Festival in Golden. Andy Cook’s tip was a lifesaver, because I’d been having trouble with noise in my HDRs.
To test Andy’s advice, I used all nine of my bracketed shots, and I was happy I did. Far less trouble with noise than previous HDRs.
Tweaking each of the TIF files (created from the aligned layers) for highlight and shadow recovery was the next step my workflow. This is also an important step to further avoid noise in the final 32-bit merge, which I learned from Glenn Randall at the August Breck Photo Fest. Glenn recommends making sure you have some highlights visible in your darkest exposure, and some shadows with at least a bit of discernible detail in the brightest exposure. Thus, I went through my brightest and darkest images and did some simple highlight and shadow recovery in Lightroom prior to proceeding.
Once I’d made sure that I had no highlight or shadow recovery needs remaining, I followed Glenn’s advice to export my nine bracketed exposures into Photomatix Pro 5. It is important that it be version 5 because Glenn’s recommendation is to use “tone mapping” with the “contrast optimizer” feature which is not available in earlier versions of Photomatix.
I followed this advice, adjusting everything using the controls in Photomatix until the image looked as best as I could get it. From that point, Glenn’s recommendation is NOT to save and reimport the photo the way you normally would, allowing Photomatix to create the final tone mapped image. Instead, Glenn recommends to “X” out to close the preview, and when asked if you would like to save the image as a TIF file, say yes, so this is what I did.
From there, I returned to Lightroom, selected my set of nine bracketed exposures, and then exported them using the Merge to 32 Bit plugin by HDR Soft.
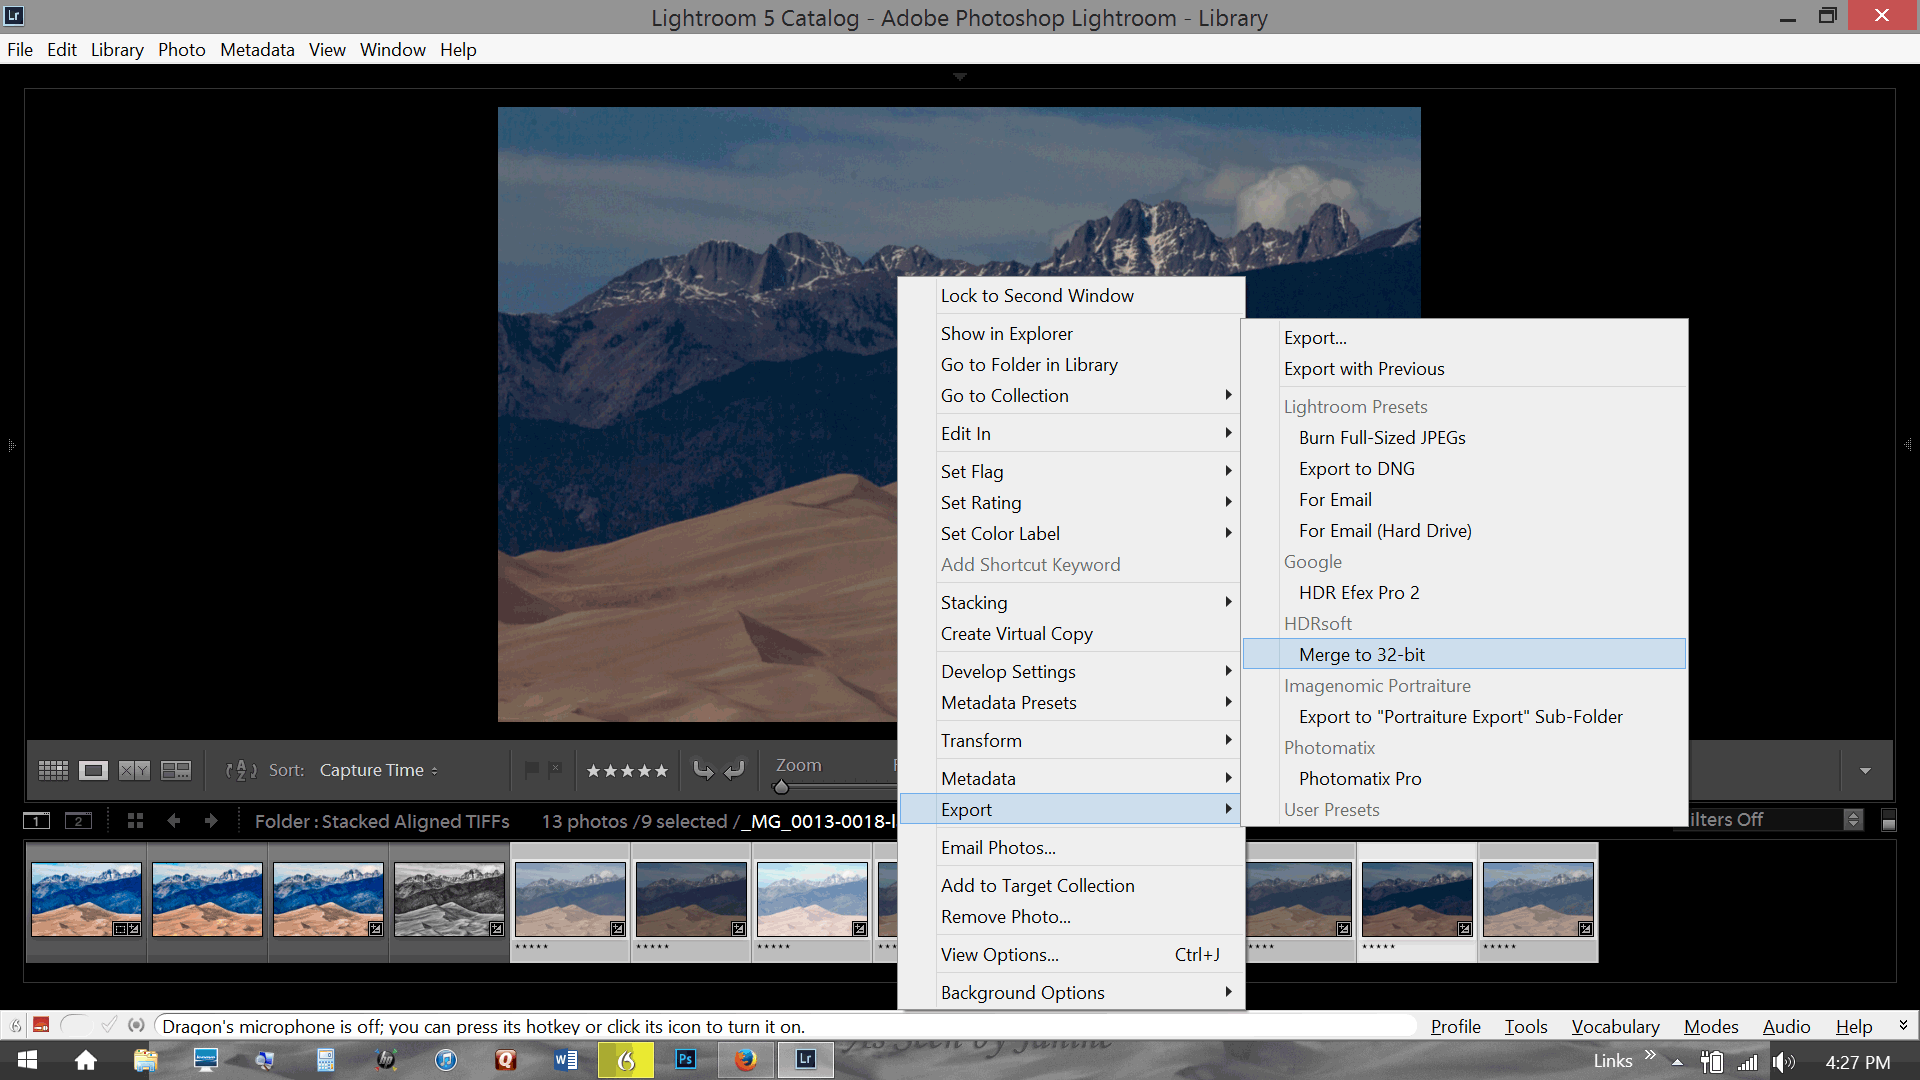
Using HDR Soft’s Merge to 32 Bit Plugin within Lightroom
Here is the initial merge to 32 bit TIF file which was created from my nine exposures, with no further post-processing yet at this point. Pretty amazingly good result without having further tweaked it at all yet and, yes, most certainly more realistic than any of the default or preset results I usually get when I allow the full-featured Photomatix Pro 5 plugin to do the merge and tone mapping.
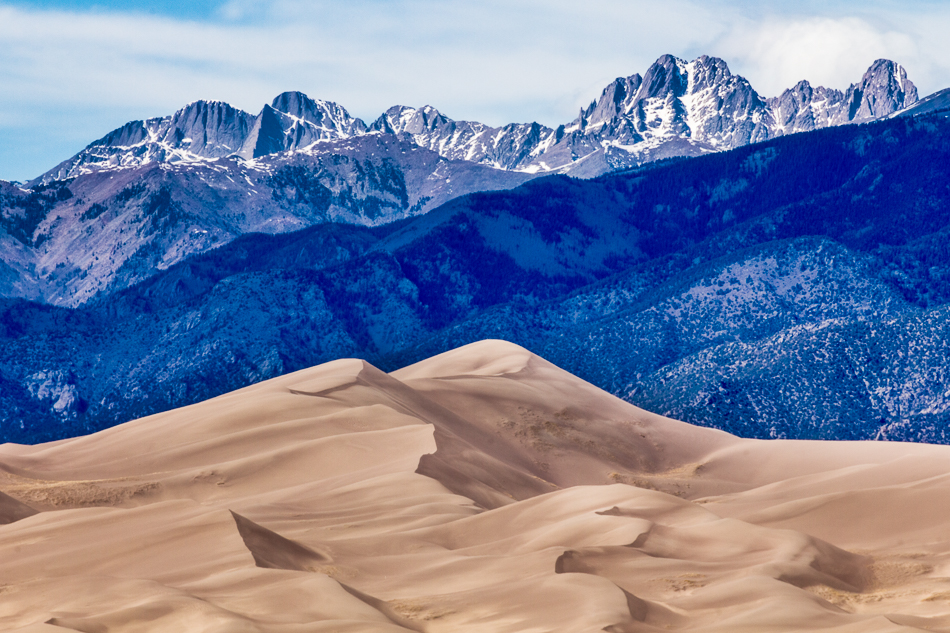
Merged to 32 Bit Default Result No Additional Processing
This actually looks pretty darn close to the way the scene really looked that day. Yes, believe it or not, the mountains really do look that blue in Colorado much of the time! I’m sure there’s a scientific reason for it, although I have no idea what it is.
As close as this was to the way my mind I remembered that scene, I knew I wanted to optimize this photo further, with some simple adjustments right within Lightroom. For starters, I spot retouched some noticeable sensor spots in the sky (Bugger! I need to clean those sensors…) I also pumped up up clarity a bit, reduced the blue channel slightly, since most people would find this much blue unnatural, and I made a few other minor tweaks within Lightroom.
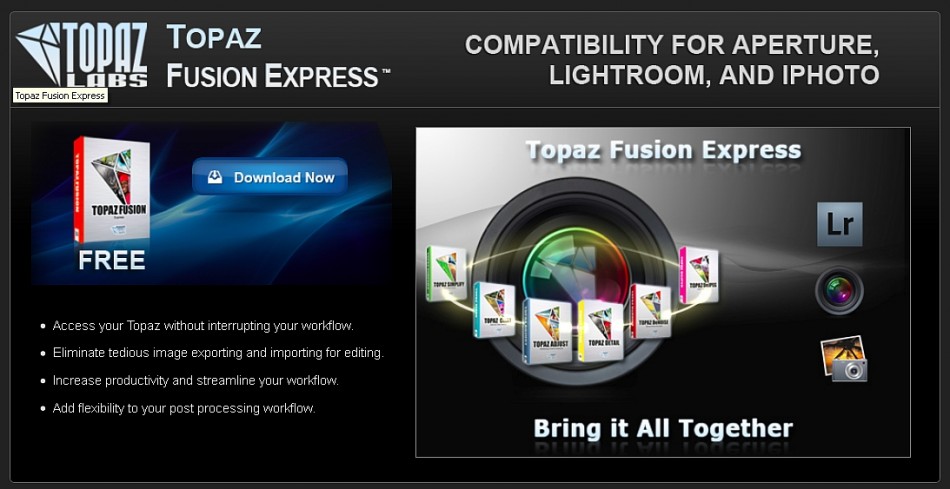
From there, I edited in Topaz Adjust 5, using Topaz’s Fusion Express plugin within Lightroom. I literally went through trying out all the plugin’s collections and presets, just to be sure, but I ended up coming back to the second one that had jumped out at me, which was the Classic Collection – Brilliant Warm preset. This is the result from applying that preset:
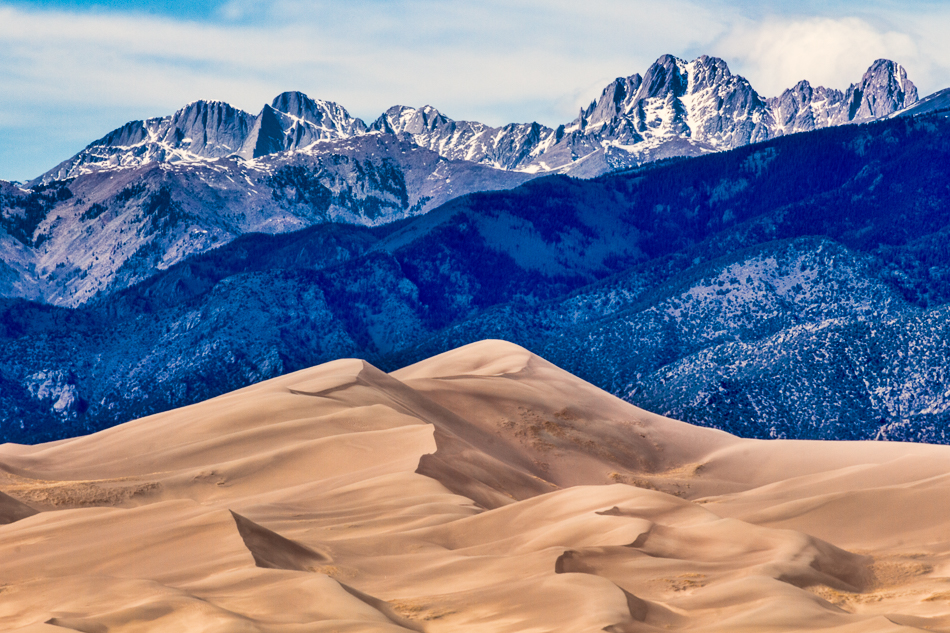
Great Sand Dunes Topaz Classic Collection – Brilliant Warm Preset
Getting warmer, both literally and figuratively! I did find that increasing the warmth made the saturation a bit too intense, so I pulled back the saturation slightly in Lightroom, following Glenn Randall’s advice not to overdo it on saturation when trying to “keep it real.” I also dodged the darkest layer of mountains in the middle using a Lightroom adjustment brush, and reduced the blue channel a bit more.
The last thing I did to make my color image as best as I could get it was to jump back over to Photoshop CS6 to do some quick healing. While Lightroom 5 has better healing tools than previous versions, I still find the healing and cloning tools in Photoshop CS6 to have greater control. I used the clone tool to remove the white spots of rocks to the far left of the image, within the darkest layer of mountains, and also used the heal tool to remove the vivid streak of blue sky at the top left of the photo. These were both compositional elements that I felt distracted the eye away from to where I wanted the viewer’s eye to go in the image. This was my final fully processed color image:
Great Sand Dunes HDR Merge to 32 Bit Final Color Image
At this point, I almost called it a day, because it’s a beautiful colorful shot and I felt I had succeeded in my experiment to try out the new realistic HDR workflow.
Still, as I looked at the incredible tonal range in this picture, the intricate layers of shadows and tones, both in the sand dunes and in the mountains, I knew that this photograph was just begging to be created into a black and white. So off I went to my favorite black and white conversion plugin, Nik Software’s Silver Efex Pro 2.
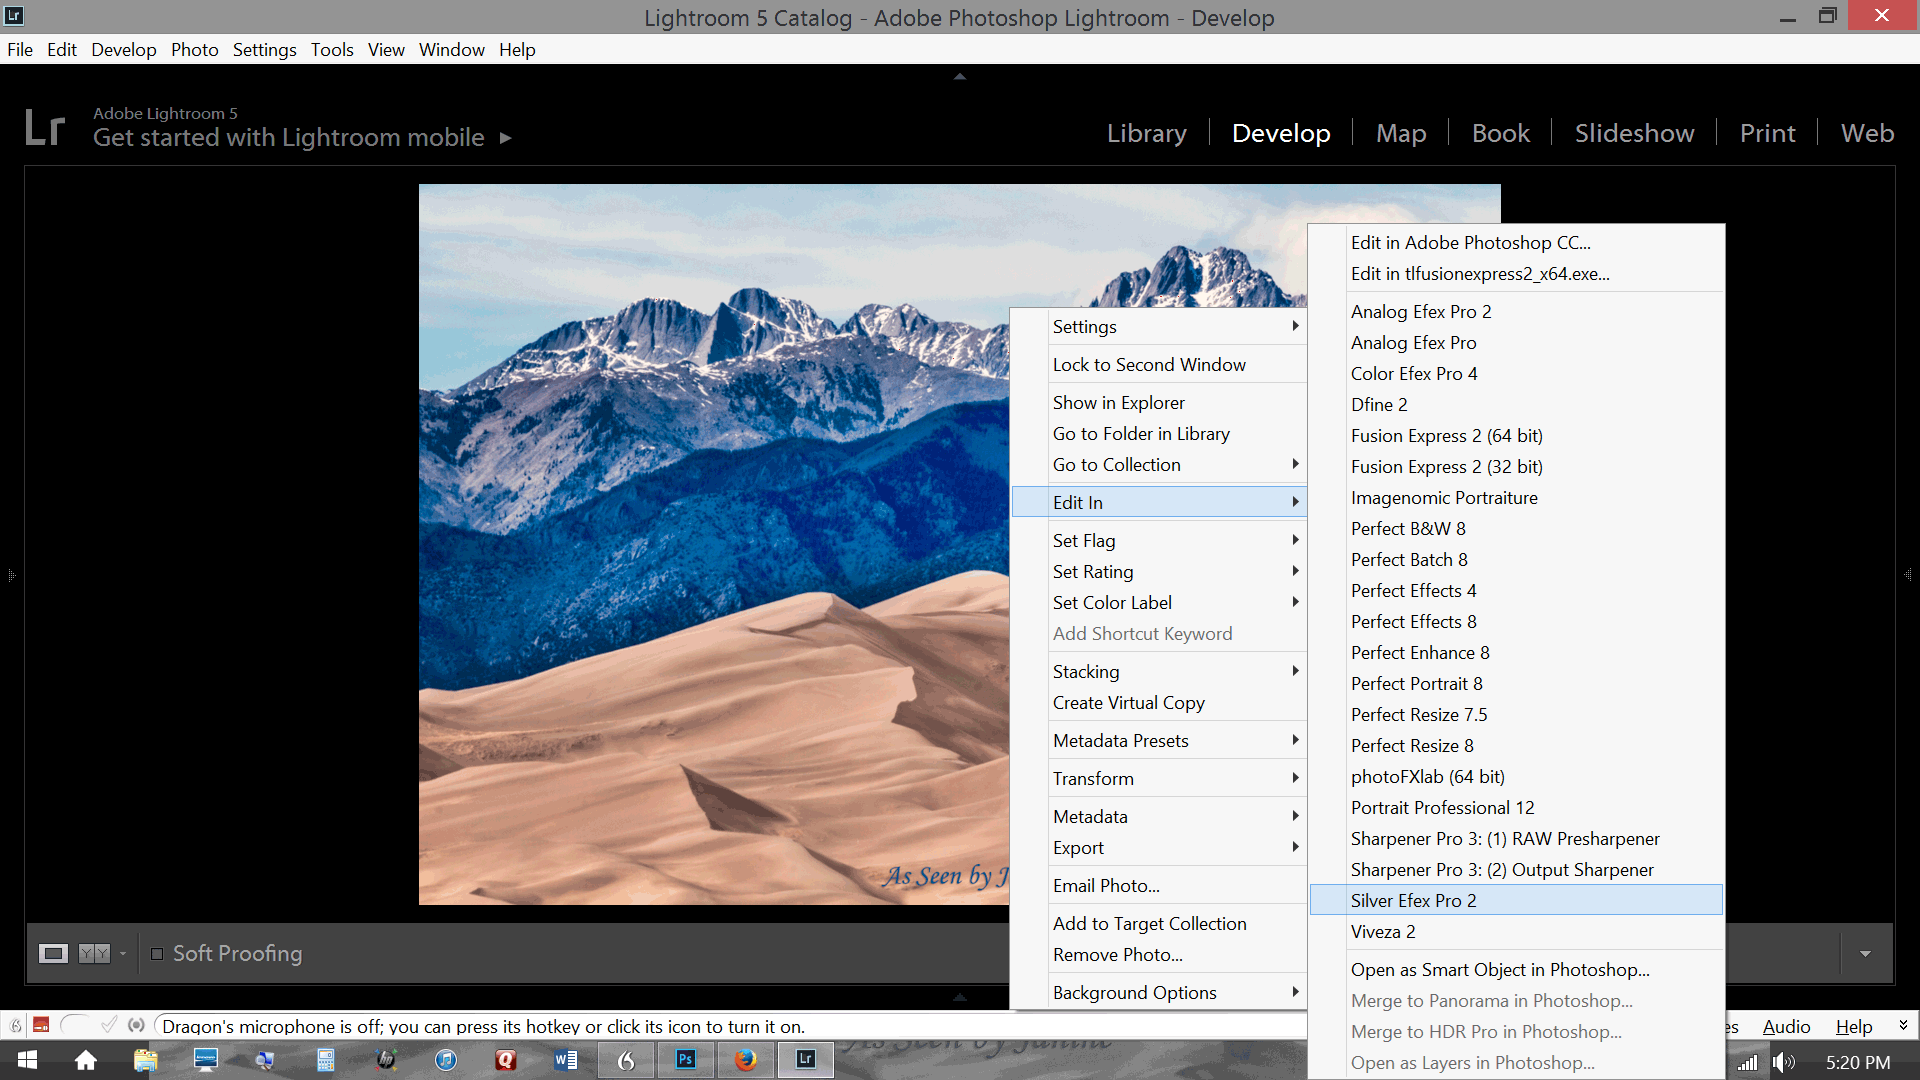
Edit in Nik Software’s Silver Efex Pro 2
Here is a screenshot showing me working within the Silver Efex Pro 2 interface. I scrolled up and down the presets on the left to find a good starting point and ended up choosing number 001 underexposed, and from there I used the fine tuning controls on the right to customize my black and white conversion:
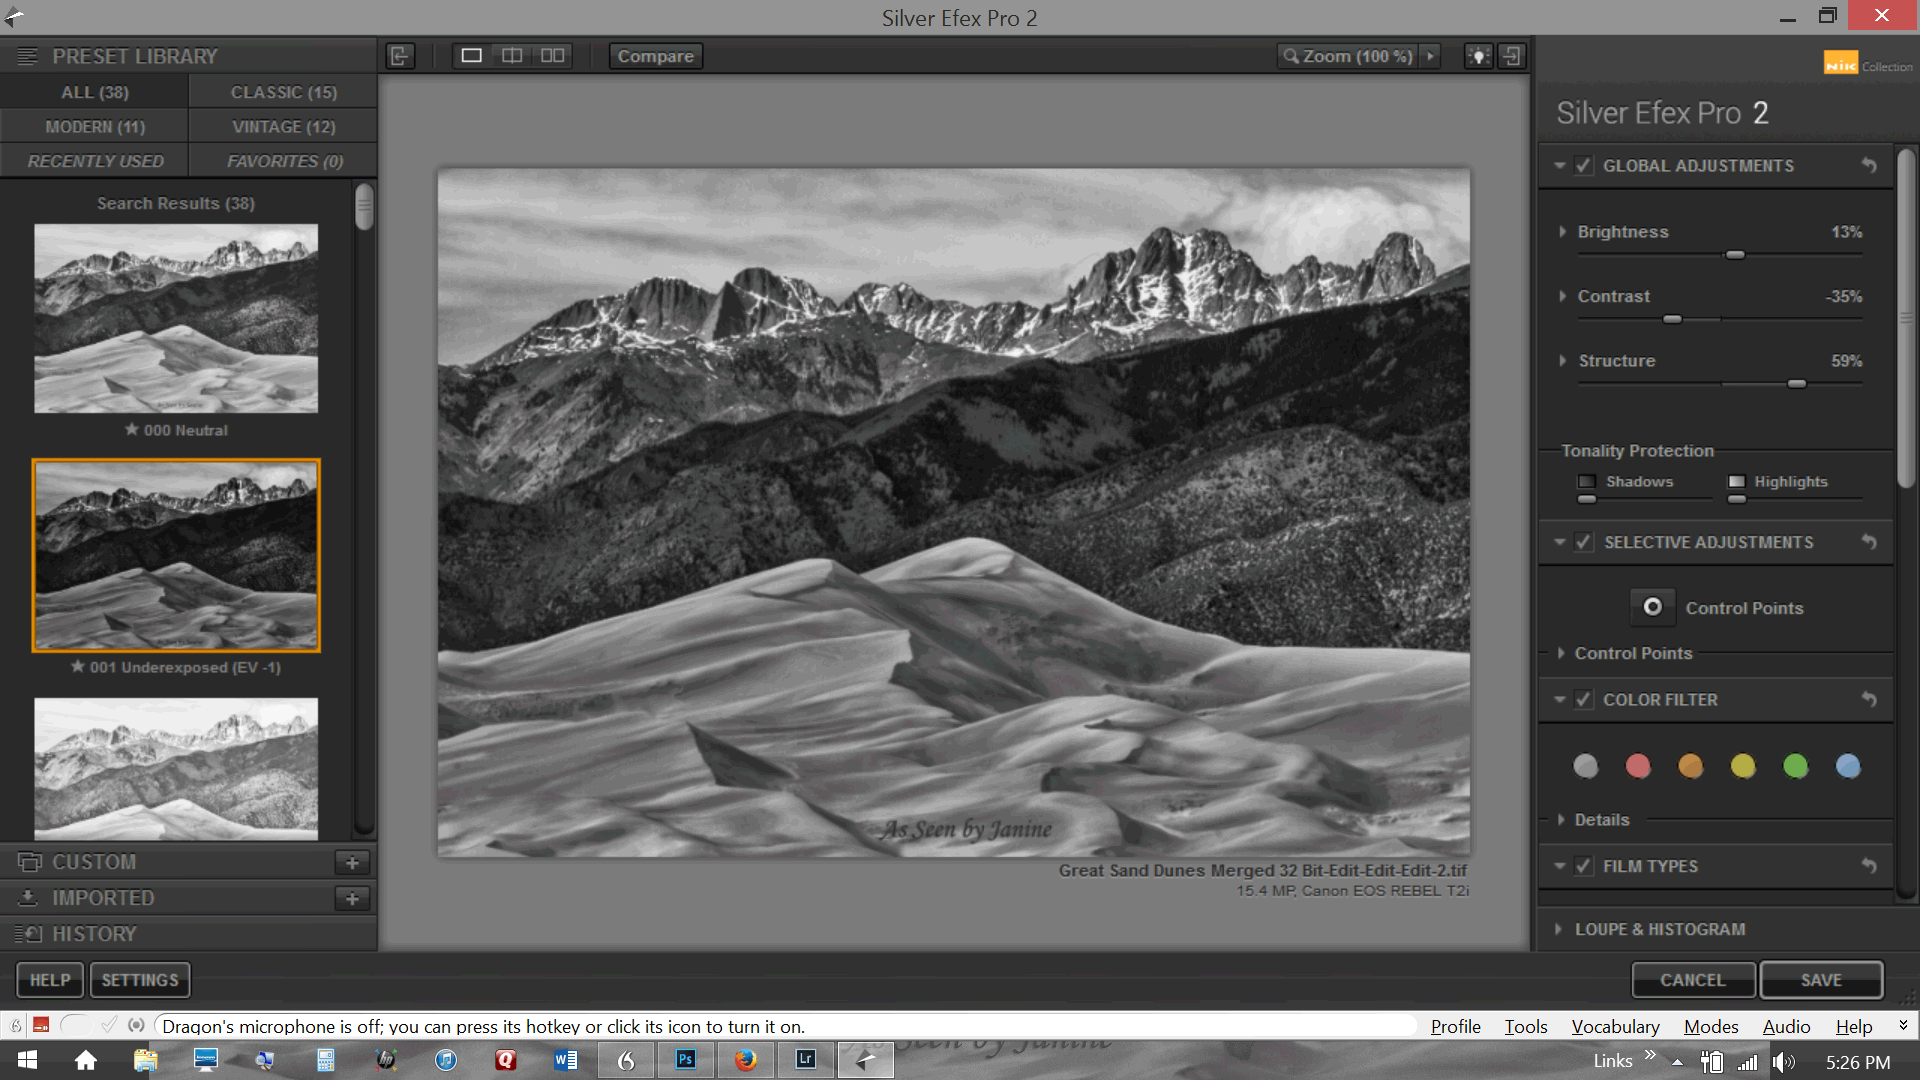
Customizing my B&W Conversion in Silver Efex Pro 2
Ironically, despite finding the underexposed preset my favorite starting point, I actually ended up increasing the exposure a little bit. The other global adjustments that I made were decreasing contrast and increasing structure, as you can see on the right global adjustments panel.
I also knew I wanted to pull out some more detail in the darkest layer of the mountains, so I moved down to the color filter options. I initially tried using the blue filter, but that washed out the photo too much; red and yellow darkened the photo too much. In the end I found the green filter was “just right” for pulling back just enough details in the darkest layer of mountains in the middle. My final step within Silver Efex was to play a little bit with the levels curves, until I found the best combinations of highlights, midtones, and shadows.
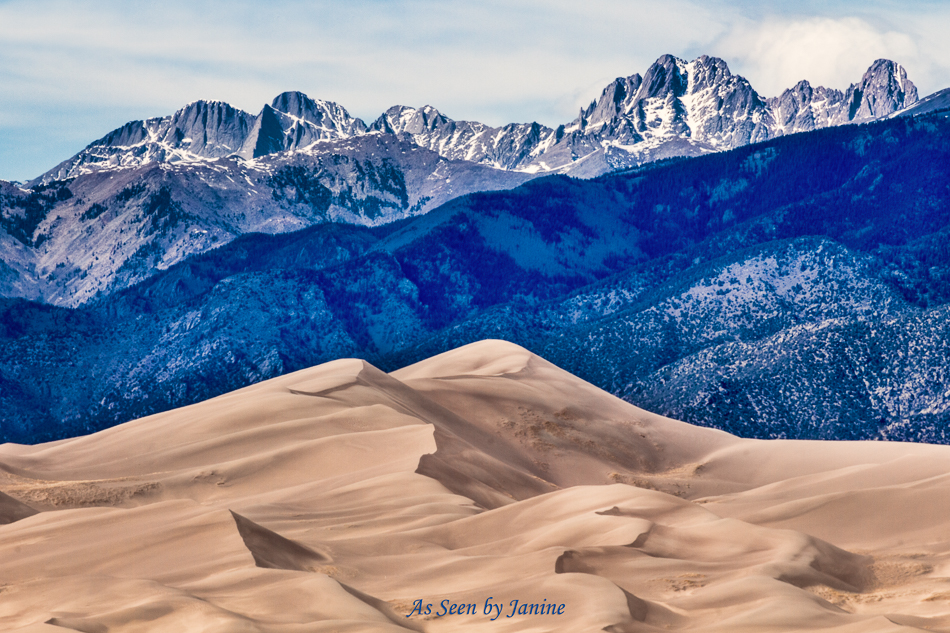
That was it; I saved my image back into Lightroom and here is the final black and white result for you to see again:
Great Sand Dunes HDR Merge to 32 Bit B&W
I am exceptionally pleased with this photograph, both because it’s simply a gorgeous landscape, and also because I really believe I achieved my goal of creating a more realistic looking HDR image.
I adore the layers of tones in the sand and mountains. I also love the sense of motion in the scene, where you can see the sand swirling like “Whirling Dervishes” in the wind. The use of nine exposures helped to more fully capture this movement of the sand, so it looks very much like my eyes saw the sand that day, that is, when I wasn’t busy trying to get the sand out of my eyes!
This photo came out so beautifully that I could barely wait to plug my HD laptop into my HDTV and I spent the better part of an hour last evening staring at this enlarged to 42 inches in my living room! Seeing how beautiful it looked that large has given me the confidence to know that I am going to enlarge and print this photograph, with hopes of entering it in Louisville Art Association’s National Juried Photo Show this summer.
Meanwhile, I still have two more days of the three day landscape challenge to fulfill. Since I pretty much groveled my way into being invited I guess I better put up or shut up! It was worth it to spend the extra time on this 1st day of the challenge though, to document my workflow, both for myself and for the benefit of others.
Give it a try and see if you to might find this workflow a great way to create more realistic looking HDR photographs. As always “comment love” is appreciated, as are shares and link backs. Have fun!
By Janine Fugere
As Seen by Janine: Eyes of the World Images


Very interesting experiment! Great work, Janine!
November 19, 2015 at 3:42 pm
Thanks Charlie, Try it out with a variety of different photos. I’ve been consistently pleased with the results. Best, Janine
November 27, 2015 at 8:01 pm
NICE POST!
THANK YOU FOR SHARING…
February 24, 2021 at 12:20 am