Don’t Delete That Photo: Bring Life and Beauty to What Seems To Be a Throw-Away Photo
I’ve been taking photographs since I was six or seven years old and taking digital photos for fourteen years now. Thus, I have thousands and thousands of photos which seem to be “throw-aways.” Still, among them are countless images I just can’t bring myself to trash, because there is something special about them to me. Some are images of a treasured memory; others seem to have the latent possibility of a truly great image which simply hasn’t been brought to life yet.
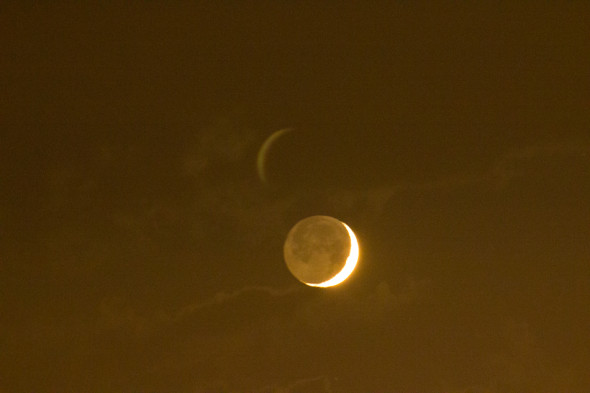
Here is one such photo, a shot I attempted of the brand new crescent moon in June 2010, the first month I ever owned a modern DSLR camera. Utterly horrifying and hopelessly crappy, right? Or is it????
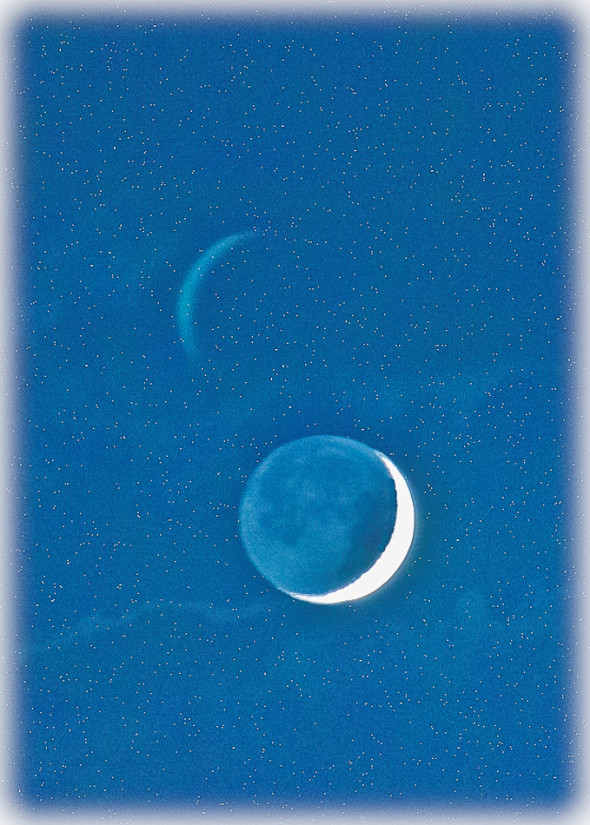
Read on to learn what inspired me to turned that seemingly awful photo into this much more beautiful image:
I have saved the old “failed” photo for years because I couldn’t give up on it. I can’t tell you how many times my finger hovered over the “remove from disk” button in Adobe Lightroom; yet, every time something stopped me. The reason is that the photo holds very special meaning to me.
I took the photograph to accompany at poem I wrote many years ago called “Brand New Crescent Moon.” Since I have a passion for both photography and writing, a lifelong dream has been publishing a book of poems and short stories I’ve written, each with a photo I’ve taken to accompany them. I am especially attached to including the “Brand New Crescent Moon” poem, since it’s one of my favorite things I’ve ever written. The poem is about my uplifting belief that each month, the brand new crescent moon rises as a metaphor to remind us that every dark phase of our lives is followed by new light. Sadly, I didn’t believe I’d yet successfully captured an image I thought was “good enough” to do justice to the poem.
It has been nearly four years since that “utterly hopeless” attempt I photographed in 2010. It has been fresh in my mind lately since I recently shared my poem with a new friend who is going through a rough time. I made the poem into a card for him, but was sad that I didn’t have a crescent moon photo of my own that I thought was good enough, so I actually bought a stock photo from Shutterstock to make the card. It has been on my mind since then though, and the experience renewed my intention to create a beautiful brand new crescent moon photo of my own.
I assumed it would mean creating a new photo, but today something inspired me to turn that seemingly worthless crescent moon photo from 2010 into something really beautiful. To find out how I did this, read on, and make sure you read to the end to see the steps I went through to make the photo more beautiful, and to read my poem which fueled my determination to succeed!
Strangely, what gave me my burst of inspiration today was coming upon someone else’s poem, a short verse called “Be Glad” by the ancient poet Rumi (1207-1273). This verse spoke of being glad to be “drunk on the milky light of the stars.” Suddenly, I envisioned my “throw away” crescent moon photo becoming magical. All it needed was making some basic exposure and color adjustments in Lightroom and, best of all, simply adding some stars to the sky in Photoshop. Thank you Rumi!
The Lightroom adjustments were easy. I simply adjusted the exposure, recovered blown out highlights, used some shadow detail recovery, and boosted the clarity a tiny bit. I then used Lightroom’s “Edit in Photoshop” function to open the image in Photoshop and clean up the sloppy and blurred edges of the crescent moon a bit. I chose to do this portion in Photoshop because I find the cloning and healing functions in Photoshop to have better control than the comparable features in Lightroom.
I considered also removing the “ghost moon” above and to the left of the moon. This is a ghosting aberration which occurred because, back when I first started shooting with a DSLR, I was stupidly still using “UV” skylight filters to protect my lenses. Using UV or skylight filters is one of the worst things you can do to cause a myriad of problems with images. I no longer use UV filters. I simply protect my lenses by using a lens hood all the time, putting my lens cap on in between shots, being super careful, and cleaning with a blower brush and lens cleaning solvent only when needed.
But back to the “ghost moon” in this photo, I have to admit that when I removed it, a sort of surreal charm of the image disappeared. I decided to count it as a “fortuitous accident’ and left the ghost moon in.
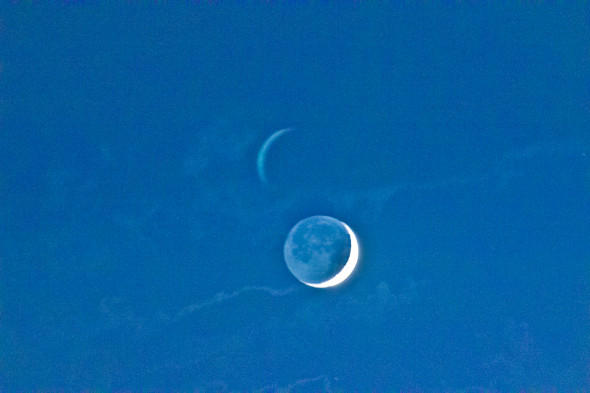
By the time I did these things, the photo was already much better, but I still didn’t like the sepia toned look to the photo. Back in Lightroom, I made a simple adjustment to the color temperature by shifting the slider left to the more “blue” end of the temperature scale. This gave me the twilight look I wanted, shown here:
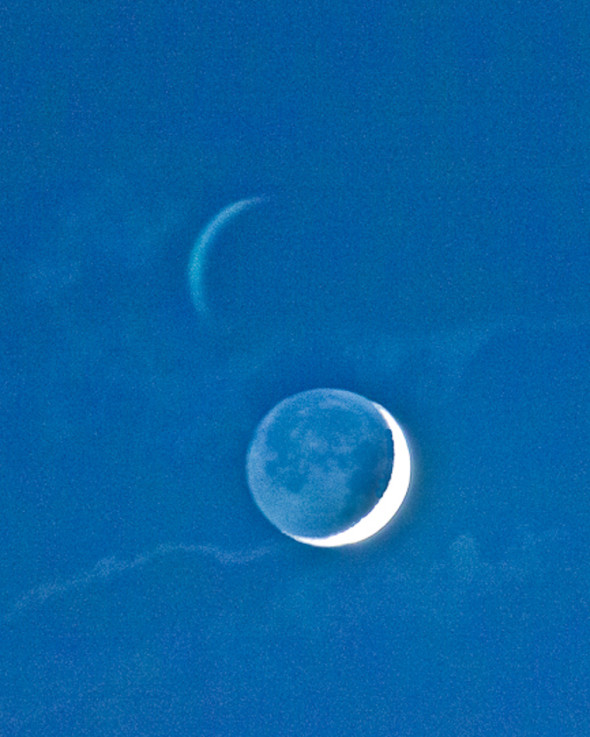
I knew I was getting much closer to the look I wanted, but I wasn’t quite there yet. I next cropped the image to a vertical format, to better frame the moon. This made the photo much more interesting and well balanced:
This photo was close to the look I was hoping for, but I still kept hearing Rumi’s words about being “drunk on the milky light of the stars,” which was what started me on my quest to salvage this photo in the first place. Thus, I knew I wasn’t finished yet!
I wasn’t quite sure how to add stars to a photo, but like anything else you want might to do with a digital photograph, all I did was Google “how to add stars to a photo” and I came across this Create A Starry Night Sky In Photoshop tutorial written by Steve Patterson. This was a very simple process which Steve leads you through step by step:
1 – add a blank layer called “stars” behind your photo
2 – fill that blank “stars” layer with black
3 – add gaussian monochromatic noise to the “stars” layer (which will become the stars)
4 – add a levels adjustment layer and use the adjustment layer’s white slider to make the noise (stars) whiter
5 – use the adjustment layer’s black slider and increase black to remove “stars ” until you have the amount of stars you want
6 – change the blend mode from “normal” to “screen” so your original sky color shows, not black
7 – use a layer mask to select only the sky portion of the original photo so the stars don’t cover anything except the sky
8 – if needed, add a “hue/saturation adjustment” layer to add a hint of color to the stars (my image didn’t seem to need this)
8 – save all the layers together and voila, you now have a starry sky!
Easy peasy!!!
Last thing I did was add a milky white vignette to the edges of the photo, to emphasize the surreal dreamy quality. This also give it that “drunk on milky light of the stars” effect Rumi had written about, which had fueled today’s inspiration for making these beautiful improvements to my Brand New Crescent Moon photo. I won’t claim that this is a world class astrophotography image, and in fact, I will be taking a Night Photography workshop soon to improve my skills. Still, I will say, this photo is now a far cry from being a total “throw away.”
Most importantly, the photo now speaks to the image I saw in my mind’s eye and captures the sentiments I felt in my heart when I wrote the poem “Brand New Crescent Moon” which appears below the photo. I hope you’ll comment and tell me what you think. I also hope other photographers will be inspired to salvage some old “throwaway” photos of their own which are special to them and, thus, worthy of saving!
“Brand New Crescent Moon”
I cannot help but smile
at first glimpse of a new crescent moon.
Another waning loss phase ended;
New life will fill me soon.
This waxing moon assures me
that light will come again.
My heart, revived, now can see;
Nature always makes amends.
The cycles will continue
but a dark sky never stays,
So I keep the faith within me
when light seems far away.
~Poem and photograph by Janine Fugere
As Seen by Janine: Eyes of the World Images










Leave a Reply