Janine’s Sweet Baby Ray’s Baby Back Ribs

Janine’s Sweet Baby Ray’s Baby Back Ribs
Not for one minute will I pretend to be either a Chef or a Food Blogger! Those roles are eloquently filled by my sister, Michele, of Cooking With Michele and her daughter, Jenny, of Savour the Senses. Nope, I’m neither the Chef nor the Food Blogger in the family; I’m the photographer in the family. Though I am a decent cook, especially with daily food blog recipes coming in from my kin for me to follow! However, this recipe is truly my own. The sole purpose for this post is that sooooo many friends have asked me for the recipe that it seemed the easiest and most fun way to share the recipe & preparation techniques. Especially since I love taking photos!
Despite my being the photographer in the family, both my sister & niece do all their own food photography, and they are both getting very skilled at it. That being said, I am going to admit right here (GULP) that I didn’t even take these photographs with my pro DSLR camera. I took them on my Android cell phone using my HDR camera app. This app lets you get pretty decent, quick, handheld shots with good exposure latitude. I know, I know, it’s not a real camera, but when you’re dealing with two giant slabs of baby back ribs, gooey, sticky BBQ sauce, HDR Camera for Android is a quick way to document what you’re doing. With that photo disclaimer, I continue to the recipe….
Janine’s Sweet Baby Ray’s Baby Back Ribs (A.K.A. The Easiest BBQ Baby Back Ribs on Earth!)
Ingredients:
- A rack (or 2 or 3) of Baby Back Ribs
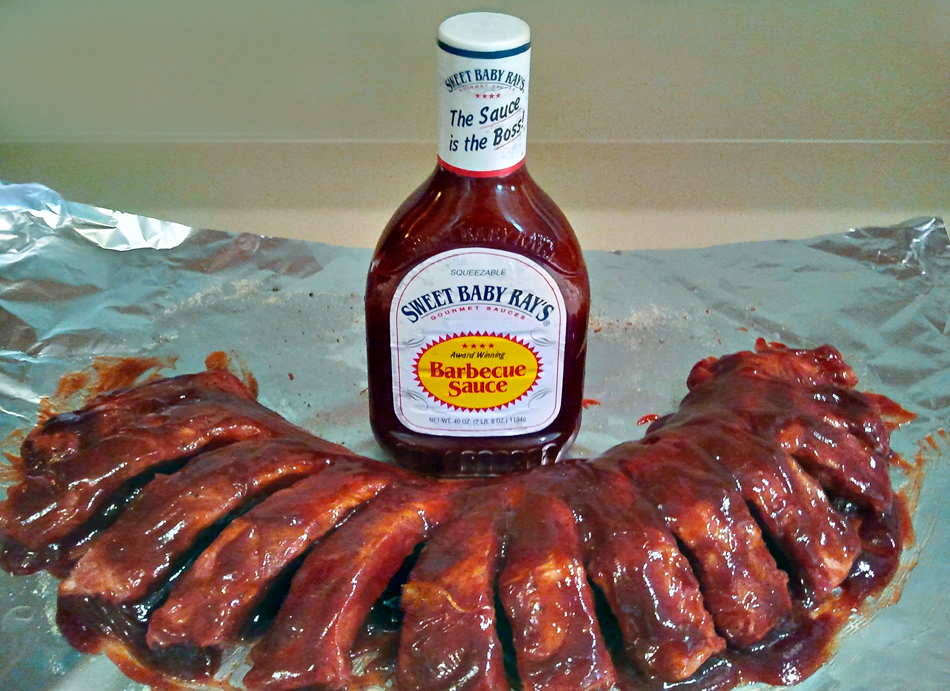
- Sweet Baby Ray’s Original Barbecue Sauce (one large bottle per rack of ribs)
- Salt
- Pepper
- Garlic Powder (not salt)
- Onion Powder (not salt)
Preparation:
- Begin preparation about 4-1/2 hours before you need the ribs to be ready – “slow & low” cooking is key!
- Preheat oven to 275 degrees (no hotter)
- Spread out a double layer of extra wide, heavy duty aluminum foil, shiny side facing down (one double layer of foil for each rack of ribs you will prepare)
- Spread out a large garbage bag over your cutting board to minimize need for disinfecting from pork later
- Take each rack of baby back ribs & slice between ribs, almost but not quite all the way through, and then fan the rack out on the double layer of foil like this:

Slice ribs amost, but not quite through & fan them out on the foil.
- Wash your hands before handling your seasonings & then generously sprinkle with salt, freshly ground black pepper, garlic powder & onion powder.
- Next, flip the rack of ribs over and fan it out again.
- Wash your hands again before handling your seasonings & then season the other side, like this:

Flip Ribs & Season the other Side
- Very generously slather Sweet Baby Ray’s Original Barbecue Sauce over the ribs, using a basting brush to get in in between all the ribs.
- Flip the rack over and generously slather Sweet Baby Ray’s on that side too. It will look something like this:
Janine’s Sweet Baby Ray’s Baby Back Ribs
- Push the “fanned out” ribs back together so they are aligned straight on the foil.
- Very carefully “tent” the double layer of foil – you want it to be sealed on the top, but with space above the ribs so all that dreamy Sweet Baby Ray’s doesn’t stick to the foil. Also carefully roll up & seal the ends, being sure to raise the end seams high enough that your sauce and juices won’t leak out.
- Your tented rack of ribs will look something like this:

Foil Tented Rack of Ribs Ready to Cook
- Set the tented ribs on a baking sheet and place in your preheated oven at 275 degrees for 4 hours. That’s it! Oh, and while you’re at it, if you’re going to make one rack of ribs, you may as well make two (at least!)

Two Racks of Janine’s Sweet Baby Ray’s Baby Back Ribs, Ready to Cook
- After cooking 4 hours at 275 degrees, remove from oven & CAREFULLY open the foil to avoid steam burns.
- Mmmmm, these look ready to eat!

Janine’s Sweet Baby Ray’s Baby Back Ribs, Cooked & Ready to Eat!
- Cut the ribs the last tiny remaining bit through to separate them, and place on a serving platter.
- Yes, you can try to drain the fat off the foil before salvaging all the Sweet Baby Ray’s to pour over the ribs…
- But let’s face it, these are ribs, not a low fat meal and as Emeril Lagasse says, “PORK FAT RULES! So I don’t bother, I just pour the BBQ sauce mess in the foil over the ribs & serve.
ENJOY! OH, AND YOU MIGHT WANT TO WEAR A BIB….
THESE ARE THE EASIEST BBQ BABY BACK RIBS ON EARTH!
Janine Fugere: As Seen by Janine


Leave a Reply