BTS on the Creation of Spring Storms Colorado Style
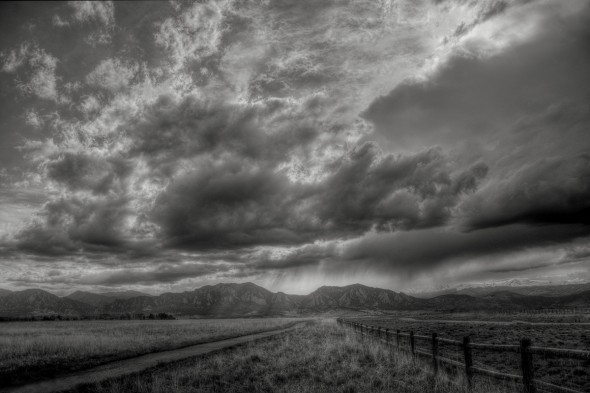
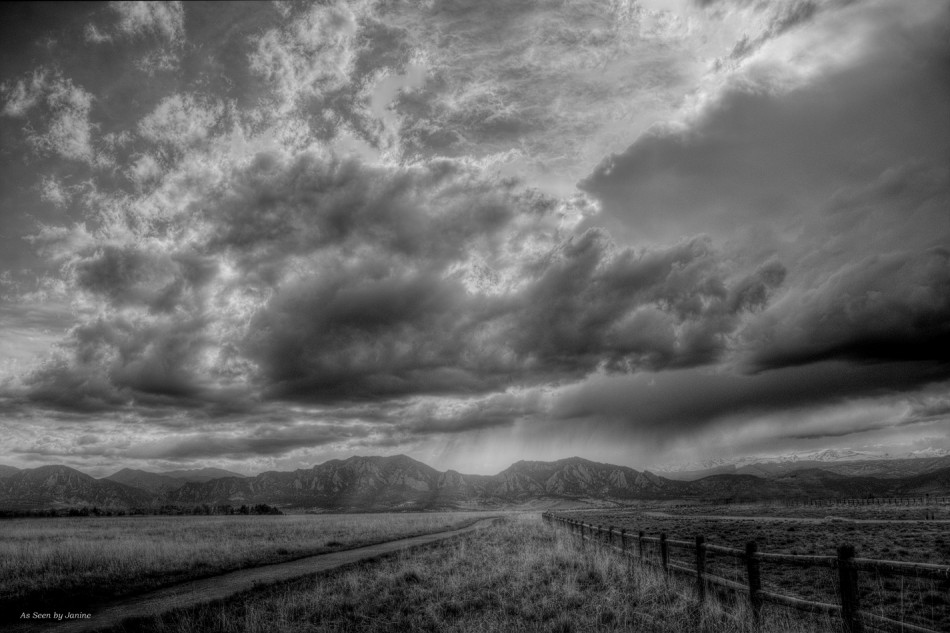
Spring Storms Colorado Style was taken at Davidson Mesa Open Space in Louisville, Colorado, facing west as spring storms loomed over the Front Range of the Rocky Mountains. As promised, here are the BTS (behind the scenes) details on my techniques for creating this photograph.
Spring Storms Colorado Style is an HDR (High Dynamic Range) image. It was created by shooting three bracketed exposures of the scene, at +2 EV, 0, and -2 EV, to capture details within the full tonal range from the brightest highlights to the darkest shadows. The three exposures were taken using my camera’s auto-bracketing function. A tripod, along with using the camera’s timer to trigger the shutter both helped to ensure no movement so the images would match up. The RAW files for all three exposures were combined into an HDR photo using Photomatix Pro HDR software. The HDR was saved as a 16bit TIFF file.
Further enhancements were made on the TIFF file using Photoshop CS5. Most notably, I removed a huge home which has sadly been built just beyond and to the right of the end of the fence in this scene, obstructing the views of the Front Range and Boulder’s Flatirons. Because I had known this view for nearly ten years before that house was built, I wanted to re-create the beauty of the scene without the obstruction of a home which, while many might consider beautiful, is not well-integrated into the landscape and severely impedes the view.
To remove the “view blocker” I used Photoshop CS5’s “edit-fill-content aware” feature to remove the house and fill the space with details that match the content around it. This content aware feature was not available on earlier versions of Photoshop; it was one of the things which made me fall in love with Photoshop CS5. Adobe has updated the program now so you can either buy CS5 from other sources or go with the newer version Photoshop CS6 (I have not upgraded, being perfectly happy with CS5, but I have read that CS6 has exciting new features for 3D graphic artists).
Back to the removal of my “view blocker.” I started by using the lasso tool to outline around the entire house. Then I used the <edit> <fill> <content aware> commands to begin my process of deconstructing the house. I say begin since, for tiny spots or removing very small objects, the “edit-fill-content aware” tool is nearly flawless, but for larger areas such as removing this huge house, a bit more doctoring is needed. I further retouched the area using the clone stamp tool to correct various parts of the edit which needed refinement. I must have done a good job because nobody at the show knew I’d removed anything until I told them; even when I pointed out where the house had been, they could not detect traces of it. No offense to the homeowners, but I believe “Open Space” should remain just that and thanks to Photoshop Cs5 and the wonders of digital technology, I have achieved this in my photograph.
My last phase of processing was to use Nik Software’s Silver Efex Pro2 to convert the color HDR TIFF into a black and white image and to further correct the tonal range of the photograph. I began by trying various presets in Silver Efex which show you various different black and white conversion effects. I chose the “Fine Art Effect” preset and then made further adjustments from there. Much like Ansel Adams work once inspired me to spend many long hours in the darkroom, dodging and burning-in various parts of traditional black and white prints, Silver Efex Pro2 inspires me to play in my “mad digital scientist’s lab” and gives me incredible ability to digitally simulate such darkroom effects, plus even far more control.
First I applied the Silver Efex “global adjustments” to the entire photo, adjusting highlights, midtones, shadows, contrast, structure, until I had the most pleasing overall appearance and tonal range. Then I used the “local adjustments control points” tools to work on specific areas. Local adjustments helped me recover a few highlight areas in the clouds which were a bit blown out and to bring back lost details of highlights in the darker areas of the grass and fence in the foreground, which had been lost in the darkness. Most importantly to me, the use of a grouped set of control points in Silver Efex Pro2 allowed me to tweak the contrast and structure in that small area between the clouds and the mountains, where the rain can be seen falling in the distance. Creative digital control enabled me to pull out the details in this distant rain which matched what my eyes had been able to see that day out on the open space.
As mentioned in yesterday’s post, while I love the clouds, the mountains, and the leading lines of this photograph, capturing that distant rain, which reminded me of a childhood memory of my dad, was my primary objective with this photograph. Thanks to Photomatix Pro, Photoshop CS5, and Nik Silver Efex Pro2, Spring Storms Colorado Style successfully evokes both the memory of that spring storm here in Colorado and also the now 40 year old memory of my dad teaching me how to recognize rain in the distance, while traveling through New Mexico.
The icing on the cake was having the photograph accepted into the Boulder Digital Arts “Creative Digital Photography” show. If you missed yesterday’s post here is a link to the photo of me with Spring Storms Colorado Style the night of the opening reception.
The exhibit, which contains my photograph and the work of many other very talented photographers, runs until August 27. Spring Storms Colorado Style is for sale, as are most of the photographs in the show. If you were unable to make the opening reception here is a map to the gallery. I recommend a visit to see some of the remarkable photographs by other artists, among whom I was honored to be included.
As Seen by Janine: Eyes of the World Images













Leave a Reply